Showing posts with label Happy Hauntings. Show all posts

Saturday, September 8, 2012

My Craft Spot Stamp Fall Release Blog Hop

If you click on the above picture, you can see it a lot bigger.


Hello everyone! IT's FINALLY the day you get to see the full reveal of the new stamps! If you came from My Craft Spot, you're in the right place. If not you will want to start at the beginning at My Craft Spot so you won't miss a thing! You can also see all the new stamp sets there too!
I made this awesome Halloween banner using the new Tiny Doilies Dies, Stampin' Around Fall, and the Spooky Treats Stamp sets for my project.
The banners were cut from Straight From The Nest at 7 inches. I used my sewing machine and sewed a zig zag stitch along the sides of the orange banners. I cut the witch's head out of chunky glitter paper from Happy Haunting. For the center banner I cut the frame from Happy Haunting and used my Gypsy to make it a little wider to accommodate the sentiment. I stamped that awesome sentiment from the Spooky Treats stamp set.
NOW, for the layered ornaments.....I saw something like this on Pinterest and LOVED it. Theirs (can be seen HERE) was made using Stampin' Up stamps and dies, and I set out to re-create one using my Cricut! This is a very time consuming project, but so worth it! I will give you a list of the cuts and quantity and then tell you how to assemble it.
Simply Charmed ornament- 15 at 2 1/2 inches out of white (cut off hanger) for each ornament- 30 total for 2 ornaments
Jolly Holidays- 15 at 2 inches out of black and white poka dot for each ornament- 30 total for 2 ornaments
Here is a cut out sheet for you to see as reference
I chose to stamp my orange and white ones, but you can easily do this with just pattern paper.
Fold all ornaments in half length wise. Assemble each petal by gluing 3 ornaments together. Here's what they will look like
When you get all of your petals assembled, you will glue them to the outside of a 3 inch circle
(these are shown is reverse colors)
Next you will cut a 1 1/4 X 12 inch strip of paper and score every 1/4 inch till the 12 inch end. Then fold back and forth on each other to create the pleated fold for the rosette center. Glue ends together and ink edges in black. Then glue rosette to a 1 inch circle. For the center of the rosette I used My Craft Spot's new Tiny Doilies Dies and layered them on top of each other. I stamped the center die with the pumpkin stamp from the Stampin' Around Fall stamp set and did a black stitching line. I glued them to the top of the rosette and pop dotted the rosette to the center of the circle using 3 pop dots layered on top of each other.
I thread all the banner pieces onto black yarn and tied Marmalade and Midnight Black crinkle ribbon in between each banner.

Now for the BEST part! Each one of us is giving away 1 one the new stamp sets! All you have to do is leave a comment on all the blogs through the hop, and that will give you a total of 9 chances!
 I am giving away the Tiny Doilies Dies!

Just leave a comment and you will be entered to win. We will announce all the winners on Monday September 10.
Now you're off to the very talented Robin!
Here is the hop order in case you get lost
Kimberly
GiGi  -You're Here!
Robin
Kate
Amber
Heather
Gwen
Ally 
Marlene
Have a great weekend and thanks for hopping along with us!

Tuesday, September 4, 2012

Day 2 Of My Craft Spots Fall Release Party


Hello everyone and welcome to day 2 of the My Craft Spot Sneak Peeks! Make sure you go on over to My Craft Spot everyday this week for oodles of cute projects and giveaways DAILY! All of the new stamp sets will be available on Saturday!
I made these fun treat holders for today's project. These would be so cute for kids treats to take to school or even hand out from home. 
The base is a really simple pocket. To create the pocket, cut a 2 1/2 X 9 inch strip of cardstock and score at 6 inches. Cut pattern paper 1/4 inch smaller and glue down, and then glue the sides to create pocket. 
I decorated 3 different examples. All of them include a drink stick in the pocket that I added black crinkle ribbon bows with tags stamped from the new Spooky Treats stamp set. Isn't that font so cool!?! I also gave you an extra sneak peek from yesterdays stamp set Stampin' Around Fall....that little spider on the tag.
The spider was cut from Smiley cards and I stamped the face with a Peachy Keen face stamp. I also added a spiderweb punched border to it. The witch's hat was cut from Happy Hauntings and the skull sign from Mini Monster. 
Thank you for stopping by today and don't forget to head over to My Craft Spot to see some more awesome projects and for the giveaway for today! Have a great day!

SUPPLIES
My Craft Spot- Spooky Treats Stamp Set, Midnight Black Crinkle Ribbon
Cricut- Happy Hauntings, Mini Monsters, and Smiley Cards
Peachy Keen- Monster Mash Face Assortment
Martha Stewart spiderweb border punch
Glossy Accents

Wednesday, October 12, 2011

Halloween Treat Bags


Hello everyone! I made these fun treat bags for several challenges....and to give to my son! I think these are called bag covers or bag genie's.  I cut a 4.25 X 8.5 inch piece of cardstock for the cover. I scored it at 4.25, 5.25, and 10. I fold on all the score lines and on the 1 inch side I stapled it in the center after it's folded over. It reminds me of a match book cover. The mice were cut from Happy Hauntings and all the stamped sentiments are from My Craft Spot's Happy Haunting set. I added suckers to one of them by simply taping them under the top flap with scotch tape. The eyeball's are in a clear sack that I stapled in to the 1 inch flap.
I am going to enter these into the following challenges:
1. Getting Cricky's Simple Sunday Challenge-  Halloween Treat Holders
2. More Than Favors Wacky Wednesday- Treat Bags or Boxes
3. My Craft Spots Monday Challenge- Color challenge, Use Black with Orange, Purple, or Green
Whimsical Wednesday's challenge this week is also Halloween Treat Containers! If you hop on over there you can see what the amazing DT put together this week! This challenge is open until Oct. 26. I hope you all are having a great day and thanks for looking!

Friday, October 7, 2011

Whimsical Wednesday Blog Hop!!!!

 The inside of the box's
 A side view of the box's


Hello everyone and welcome to the Whimsical Wednesdays Blog Hop! If you came here from Chloe, then you're in the right place. If not, you will want to start at the begining at Whimsical Wednesdays so you won't miss a thing! There are a TON of great prizes up for grabs! Here is the list:

1. Trendy Twine:  Original Sample Pack

2. Trade Fish Designs:  Rest In Peace Stamp Set

3. Prairie Bird Boutique:  One bundle of Shabby Crinkle Ribbon-you get to chose the bundle.

AND FOR THE GRAND PRIZE.....
The grand prize for the hop is from PSA Essentials. It is a stamp package valued at MSRP $75.00 and includes the Stamper Body, A Peal and Stick Stamp Set, One customized stamp, and an Orange/Black Inker. In order to be eligible for the blog candy you must leave a comment on each blog and then go back to Whimsical Wednesday at the end of the hop and leave a comment.

O.K. now on to my projects! I bought all these cute mini Halloween anti-bacterial gels at Bath And Body Works and thought these would make such cute treats for a friend, sister, mom, ect. It might not be candy, but what a nice treat this would be. I found this wonderful tutorial on how to make the box's HERE. I did change the pattern a little. Instead of using a punch for the hole to hold the gel, I just cut out a square. The punched hole wasn't big enough to get the bottle into. For each gift box, I made a matching card to go with. I am going to list the supplies for each set. All of the crinkle ribbon is from Prairie Bird Boutique and all the sentiment stamps are from My Craft Spots Happy Haunting set.

Dracula:
$1 Draculs stamp from Michaels colored with Copic Markers
Nestability Lacey Circles and Lacey Squares die
Fiskers Oval Punch and Scallop Oval Punch
Paper is from Recollections Midnight Magic stack

Witch's Shoe: (This is not my original idea! You can find a great tutorial HERE on how to make this shoe)
The shoe was cut from Happy Hauntings
SUPER thick black glitter paper
Crinkle Ribbon
Scallop Scissors
Martha Stewart Drippy Goo Punch

Ghost:
Ghost stamp is from Peachy Keens Halloween Mini's set colored with Copic markers
Nestabilities Lacey Circles and Lacey Squares Die
Crinkle Ribbon

I hope you all enjoyed my projects and I didn't overload you too bad! LOL! Don't forget to leave comments on all the blogs and at Whimsical Wednesdays to qualify for the great prizes! Now you're off to the super talented Shelly!

Sunday, September 25, 2011

Halloween Z Fold Card


Hello everyone! I have a card to show you today that I did for fun. I love doing Z fold cards and this one was super fun to create.
I cut Frankie, the fence, the bats, and the witch from Happy Hauntings. I cut 10 layers of grass from the fence cut for the grass in front of the mansion. ( I know...I'm crazy! LOL!)  The mansion was cut from October 31st and I hid all the layers in my Gypsy to get the solid piece for the back. The sign I cut by hand and stamped it and the inside of the card with stamps from My Craft Spots Happy Hauntings set.
I hope you all are having a great day and thanks for looking!

Sunday, October 24, 2010

Recessed Window Halloween Card


Hello everyone! Isn't this card just TOO CUTE? I love how it turned out. I saw a card this weekend using this recessed window technique over at Glendas Cards and had to try it. I found the tutorial here at Splitcoast Stampers. Thanks to Glenda for leaving that info. I cut the web from Oct. 31st at 4 inches and put it in the corner of my card. I also cut the spider from Doodlecharms at 1.5 inches and the couldron from Happy Hauntings cut at 2.5 inches. I pop dotted the spiders head on the body and also on to the card. The couldron I cut twice, once in green that I used the hide contour feature on my Gypsy (I got my Gypsy!!!!) and once in black as the regular cut. The bat and ghost are stickers that were bought from Wal-Mart in the Halloween section and the BOO sentiment is a Peachy Keen stamp. I hope you all will give this technique a try! It's not hard and the end results are very rewarding! Have a great day!


Saturday, October 2, 2010

Witch Gate Fold Card


Hi everyone! This is a card I made to enter into several challenges...
1. Jitterbuggin'- Sketch + A trick or treater using 2 carts to create + a star.
2. Pink Stamper- Spooky card
3. Fantabulous Cricut- Faux or real stitching
For this card, I created my trick or treater using Once Upon A Princess for the girl and PDDU for the costume. I had to do some test cuts to get the clothes to fit, I think they turned out cute on her. The couldron is from Happy Hauntings and the cat and broom is from PDDU. This is a gate fold card, one of my favorite types of cards to create. The sentiment is from Peachy Keen. I hope you all are enjoying this beautiful Sunday! Take Care!


Wednesday, September 29, 2010

Halloween Z Fold Card


Good evening everyone! Cricut Cardz Challenge blog's challenge this week is to make a Halloween Z fold card. I had a lot of fun creating this card.....there's lots of Cricut cuts on here. I cut the skeleton (4 inches) and the tree (4 inches) from Paper Doll Dress Up. The iron gate is cut at 3.5 inches from October 31st. And the grass/graveyard(3.5 inches) , the big grave(4 inches) and the bat (2 inches on real dial size) was cut from Happy Hauntings. I chose to hand write in the "Willy Rot" because it was to small to try and glue....thats why it's a little off center. I pop dotted the grass/graveyard and fence on the front of the card and I pop dotted the big grave also. The bat I pop dotted too, but I put double the thickness on the wings so they look like he's flying. The moon I cut from George at 2.5 inches and just squared it off to fit in the corner of the card. The sentiment is a Peachy Keen stamp. I hope you all are having a great day! Take care!
I'm also going to enter this in Getting Cricky's halloween challenge.

Wednesday, September 8, 2010

Spooky Spider Card


Hi everyone. I'm finally able to create a little today. This card I did for 2 challenges: CARDZ TV and Getting Cricky. Both are Halloween challenges. I just found Getting Cricky and it looks like it has fun challenges. The prize for this Halloween challenge is a new Thanksgiving cart from Memory Miser(one of my favorite places to shop!) The challenge is open until Sept. 30th and you can enter as many times as you want. OK, on to the card! The spider is from Paper Doll Dress Up cut at 2.5 inches, the web is from October 31st cut at 5 inches, and the sentiment is from Happy Hauntings cut at 1 inch. I trimmed the card around the web on 2 sides to get this look....it had needed something and this worked perfect! I also added some google eyes to the spider and some jewels under the sentiment. I hope you all are having a great day! Take care!

Thursday, August 26, 2010

Matching Halloween Card and Bag


Good evening everbody! I have been in my craft room all afternoon playing with my new blue Cuttlebug! :D When I ordered my Cuttlebug I decided to order some die cuts too. That is what inspired me to make this adorable matching set. I cut the witch from OUAP at 3.75 inches and embellished her with one of my new Cuttlebug sets called Disney's Tricks and Treats Die and Emboss Set. I used the witches hat, the couldron, the stick (wich is actually the broom) and the candy. Her dress is Dress 2 and I embossed it with the Skeleton Scroll Cuttlebug folder. Her stockings were cut from the Fairy costume. The bag is also cut from OUAP at 6.25 inches and then before I glued it all together I took my 1.75 inch circle punch and punched a hole in the center of the bag. I then added some acetate to the back of the circle hole so I could fill the bag with candy. For the handle on the bag I used some wire and threaded on some beads to create the handle. I used Happy Hauntings for both sentiments and shadows. I hope you all enjoy this. I am also going to enter this in Erin Lee Creative. She has a Halloween challenge going on sponsored by Oh My Crafts. Take care everyone!


Saturday, August 21, 2010

Throwback Thursday Frame It


Hi everyone. This is the card I made for Emma's Throwback Thursday challenge this week. The challenge was to make a frame card and use the Paper Doll Dress Up Cartridge. I cut the spider web from PDDU at 4.5 inches, the frame from Storybook at 5 inches, and the sentiment from Happy Hauntings at 1.5 inches. On the inside I cut the cat from PDDU at 2 inches. I used my Center Point button on my Expression to cut the cirle on my card and the frame. I really like that feature! I also did some penning on the cat in silver to give him a little more personality and to show up better. I think this turned out so cute! I hope you all are having a great weekend!


Sunday, August 15, 2010

Coffin Treat Boxes


Hi everyone! I decided to make a couple of these cute coffin boxes from Happy Hauntings. The box is cut at 7.5 inches and the colored top layer (shift layer 2) is cut at 7 inches. After some experimenting this was the perfect size. I tried cutting it at fit to page but it cut at 11.5 inches! Huge.....in case you want to go really big! Like almost a small gift box huge. Also, in case anyone was wondering the "coffin box" is the bottom and the layer 1 is the top. And they fit together really good. Anyway, Dracula and Frankie are cut at 3.5 inches. There are alot of layers for the faces....shadows and such. After cutting several of these I decided just to color in the shadows with colored pencil to see how that worked...it worked fine. Otherwise the faces get REALLY thick. I also did alot of white and black pen on them seeing as how their clothes are very plain and one piece. Well, I hope you all are enjoying the weekend!

Wednesday, August 11, 2010

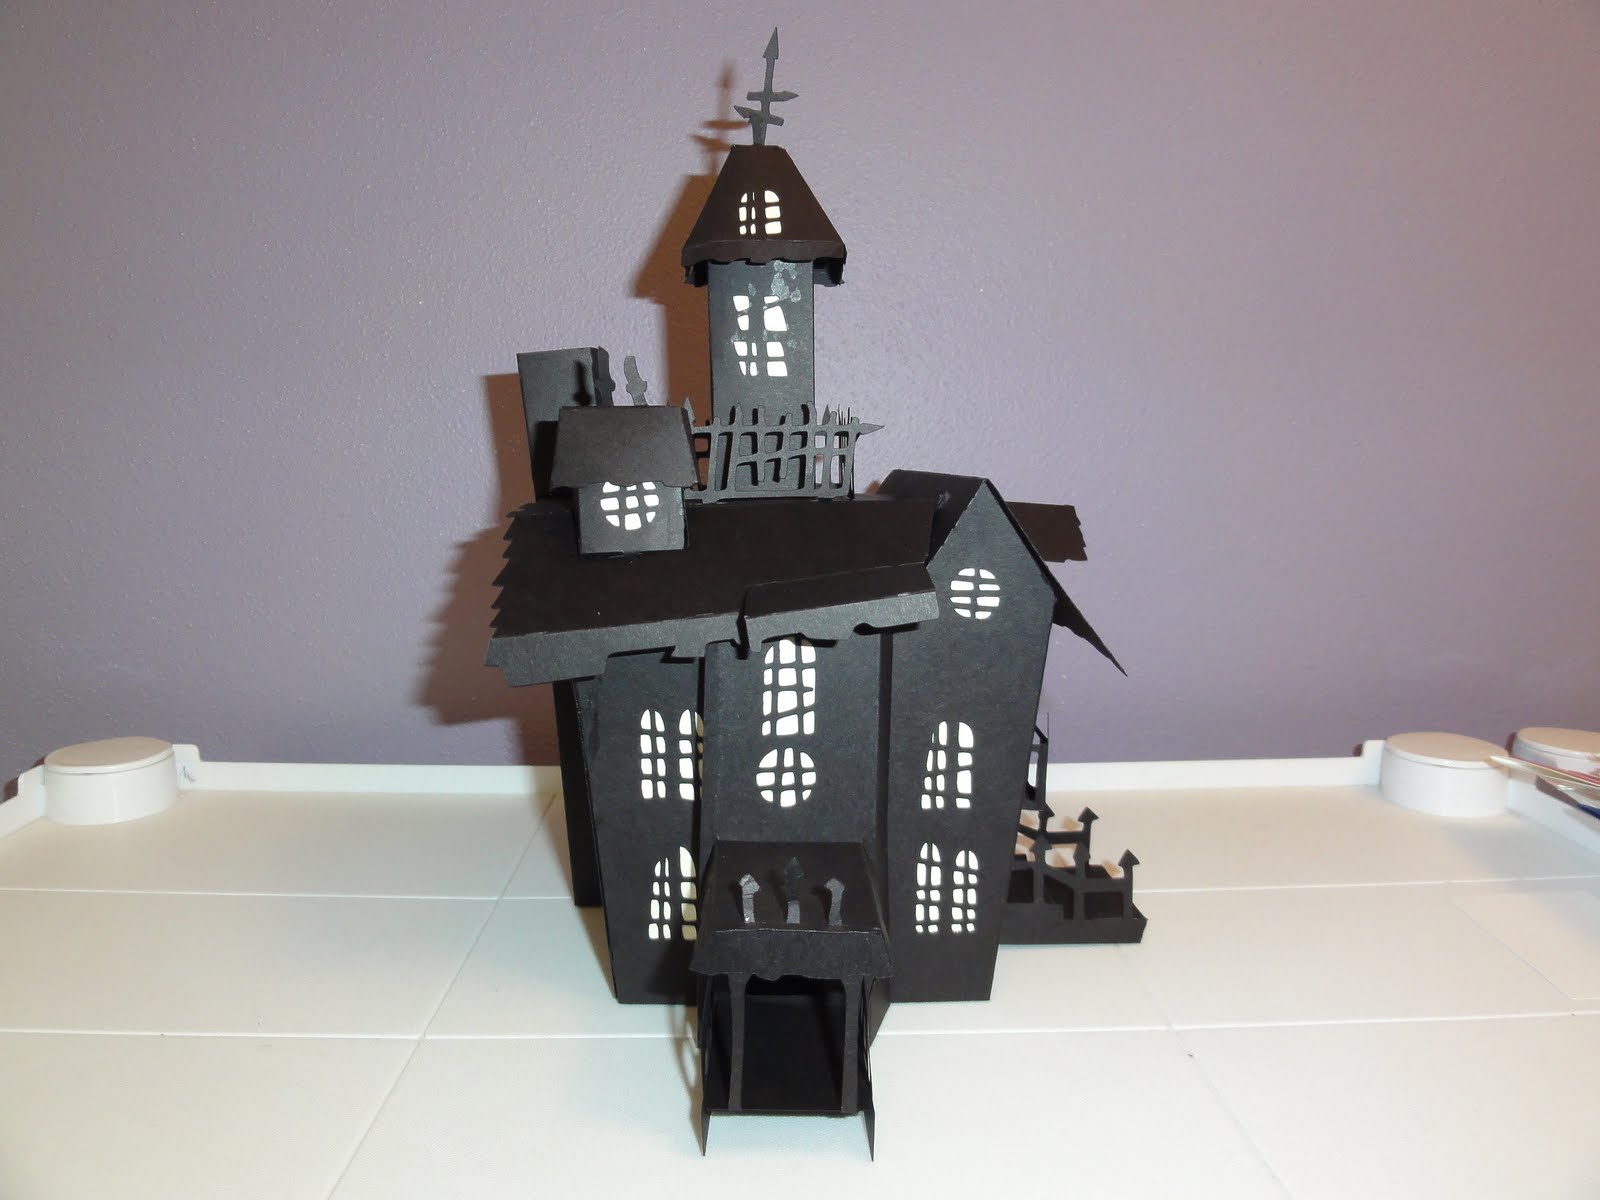
3D Haunted Mansion


I just got Happy Hauntings and couldn't wait to put together this 3D haunted mansion. It's cut at 6.5 inches. It took me 2.5 hours from start to finish and had no problems what so ever. I did use ALOT a black paper though...lol! Finished it measure about 11.5 inches tall. Hope you all like it!