Monday, December 31, 2012

Congratulations!


Hello everyone and Happy New Years Eve! I am finally back from the holidays and then my brother got married on Sat. so we were out of town.
This is the card that I made for my brother and his new wife. It's just too bad that I forgot it here at home! LOL! So me, the card maker in the family had to BUY a card! EEK!
I stamped and colored the glasses and banner using Peachy Keen's December SOTM kit. I covered the glasses with Glossy Accents and stickles for the bubbles. The background was embossed with a cuttlebug folder and I did some inking. I cut out the banner and stamped that wonderful sentiment from My Craft Spot's Happily Ever After stamp set and also added stickle dots.
I hope you all have a wonderful New Years Eve and thanks for stopping in. 
I will be picking the winner for the PK face stamps tomorrow, so if you haven't entered yet, do so before tomorrow!
SUPPLIES
My Craft Spot- Happily Ever After stamp set
Peachy Keen- PKSC-12 December 2012
Seeing Spots Cuttlebug Folder

Friday, December 28, 2012

SUPER EXCITING NEWS!!!

Hello everyone! If you visit my blog regularly, you know how much I LOVE my Peachy Keen stamps! Well, I have been busting at the seams waiting to announce that I have been chosen to be a part of the 2013 Peachy Keen Design Team! Whoo Hoo!
I CAN NOT wait to share with you this year what I create using my PK stamps and want to say thank you to PK for giving me this awesome opportunity! There is some seriously talented designers on this team and I am looking forward to working with all of them! 
I thought I would share a couple of projects I made using my PK stamps:


Ummm, can you tell that I LOVE my PK face's? LOL! 
Well, in celebration of my news, I want to do a GIVEAWAY! And of course the giveaway would have to be some Peachy Keen face stamps!!!
Here is what I am giving away
Peachy Keen's Wide Eyed Kids 1 1/8 inch face stamps. 
Just leave a comment on this post and I will pick a winner and announce it here on New Years Day! Please be a follower of my blog and don't forget to leave me a way to contact you if you should win this super cute stamp set! 
Thank you so much for celebrating with me and have a great day!

Saturday, December 22, 2012

MERRY CHRISTMAS EVERYONE!


Hello everyone! Christmas is only a couple of days away now and sometimes we forget the true meaning of Christmas. I know I do. We get caught up shopping for that perfect gift, making the best meals, etc. So I wanted to share this card, a reminder to me what it's truly about.
First off I have to tell you that this card is SO much prettier in person. I tried and tried to get a really good picture, but it just wouldn't come out any better than this. 
The manger scene was cut from Winter Frolic and I used lots of embellishments on it. I stamped the face with a Peachy Keen face, added chunky glitter to the star, and a added shredded raffia for the hay in the bed. The shadow layer and the card base were cut from metallic gold paper. I inked the edges of the cream background and added a metallic gold strip at the bottom with a raffia bow. To finish, I stamped the sentiment from My Craft Spot's Bundle Of Joy stamp set. What a perfect sentiment for this card, wouldn't you agree?
I want to wish you all a MERRY CHRISTMAS and HAPPY NEW YEAR! Thank you so much for stopping in today and for all your bloggy love through out this year! HUGS!
SUPPLIES
My Craft Spot- Bundle Of Joy stamp set
Cricut- Winter Frolic
Raffia and MS Chunky Glitter

Thursday, December 20, 2012

White Christmas


Hello everyone! I have a card to share today. This is my attempt at a white on white card. Every time I see one, I think to myself, how pretty!
This card has LOTS of embossing and dimension. I used 3 different embossing folders on this card. I used the Snowflakes for the background, Tim Holtz Tree's for the pine tree's, and Divine Swirls for the snow. After I embossed the trees, I cut them out and added them to the card background.
The horse was cut from Winter Woodland and I added glitter stickles to the gray parts. I mounted him on pop dots along with the bottom layer of snow. 
To finish I tied some silver tinsel trim around the snow, punched the oval, stamped the sentiment, and mounted it with pop dots. 
I hope you all liked seeing my card and thanks for stopping in today!
SUPPLIES
My Craft Spot- Joy To The World stamp set
Cuttlebug Snowflakes and Divine Swirls embossing folders
Tim Holtz Trees embossing folder
Cricut- Winter Woodland
I am entering this into Exploring Cricut's "It's The Most Wonderful Time Of The Year" Challenge. 

Monday, December 17, 2012

JOY Shape Card


Hello everyone! It's time for a new challenge at My Craft Spot! This week the challenge is "Christmas Shape Cards".
I made this fun card in CCR. I welded the J and Y to the snowman shadow to create the base of my card. The J and Y are from Cricut Craft Room Basics and the snowman from Winter Frolic. I stamped the snowman's face with a Peachy Keen face and added LOTS of glitter to him. I also stamped the sentiment to the bottom of the snowman from My Craft Spot's Think Snow stamp set. After the base was complete, I folded a piece of white card stock in half and glued my image down. Then I used my scissors and trimmed around the card to give it it's shape. 
I hope you all will play along this week and please don't forget to check out what the rest of the DT has created! Have a great day!
SUPPLIES
My Craft Spot- Think Snow stamp set
Cricut- Winter Frolic and Cricut Craft Room Basics

Friday, December 14, 2012

Happy Birthday!


Hello everyone! I wanted to share the card that I did for Peachy Keen's challenge. This week the challenge is this sketch AND it's The Peachy Queen Kathy's Birthday too!
I just adore Kathy's Peachy Stamps and want to say HAPPY BIRTHDAY Kathy!
I stamped the candles from the new December Stamp Of The Month Kit and used the Retro Paper Doll stamps for their faces. I colored them in with Copic markers and added the stamped sentiment banner. To finish I added a ribbon and bow. 
Thank so much for stopping in and have a great weekend!
SUPPLIES
My Craft Spot- Inside and Out Set #2

Wednesday, December 12, 2012

NO Peeking!


Good morning everyone! I have a super sweet bag to show you today that I used My Craft Spot stamps on. This week at My Craft Spot the challenge is "Wrap It Up" Create gift packaging. You have until Monday to get your project in for a chance to win a stamp set!
I made this bag using THIS tutorial I saw the other day. It it really easy to do and I love how you can re-size it to any size you need. 
My bag is smaller. It measures 5.25 X 5.5 inches. Perfect for those little gifts.
After I created the bag I added some decorative paper and ribbon handles. I also tied bows to the front and added the tag. The teddy was cut from Teddy Bear Parade and the circle mats from George and Basic Shapes. I also cut the ovals for her paws from George. I opted to not use her big reindeer nose that goes with this cut and instead stamped the face with a Peachy Keen face stamp. I added Glossy Accents to her nose and tied some twine for her antlers. For the bottom of the bag I punched an oval, stamped the sentiment, and added it to a banner that I scored and folded back and forth.
I hope you all like my bag and thanks for stopping in! Have a great day!
SUPPLIES
My Craft Spot- Mistletoe stamp set and Cherry Divine Twine
Peachy Keen- PK-110 Here Kitty Kitty Face Assortment
Cricut- Teddy Bear Parade and George and Basic Shapes

Tuesday, December 11, 2012

Snowman Ornament


Hello everyone! I wanted to share the project that I did for Peachy Keen's challenge. This time the challenge is 3D Objects: Ornaments.
I started this project by recycling a light bulb. I cleaned out the light bulb (which incidentally took me longer to do than the entire project and probably will never do again...LOL!) and filled it with Glossy Accents and glitter. Then I stamped the face on the glass and heat embossed it. This made it permanent....which I didn't know, I was just experimenting. It took a couple of tries to get it to stamp decent and I found that if you cupped the stamp in your hand it stamped a lot easier than if it was on a block. I then colored the nose and mouth with Copic markers and added some Viva Decor Pearl accents for the cheeks and eyes. The hat I created by cutting a piece of fleece and hot glued the folded up part and seam. Then I cut into the top about 1 inch down all the way around the hat. I hot glued it to the light bulb and then gathered the cut strips and tied it with some twine also adding a hanger. I cut the holly from more fleece and punched the berries with my Crop A Dile.
I hope you all liked my ornament and thanks for stopping in! Have a great day!
SUPPLIES
My Craft Spot- Honeydew Twinery Twine
Peachy Keen- PK-483 Winter Wonderland Faces
Recycled Light Bulb
Fleece 
Hot Glue

Monday, December 10, 2012

Gingerbread Gift Set


Hello everyone! It's time for a new challenge at My Craft Spot. This week the challenge is "Wrap It Up" Create a box/ bag- gift packaging.
I made a gift set for this project. I wanted to include a card for this too, so I did. :) 
I cut the box from TBBM2  and the gingerbread man from Create A Critter 2. I stamped the gingerbread faces using a Peachy Keen face and used a white gel pen for the dots. I also added a twine bow to them too. 
On the card I used my sewing machine a did a stitching line around the mat and heat embossed the sentiment. For the box I added some hearts that I cut in Cricut Craft Room and stamped the sentiment on the box lid. 
I hope you'll all play along and please don't forget to check out what the rest of the DT had created for your inspiration. Have a great day!
SUPPLIES
My Craft Spot- Joy To The World stamp set and Peppermint Stick Trendy Twine
Peachy Keen- PK-520 Winter Face Assortment
Cricut- TBBM2 and Create A Critter 2

Sunday, December 9, 2012

Travel Mug Gift


Hello everyone! I wanted to share the second project I did for the Peachy Keen Release Party challenges. For this challenge you were to add a "drink" to your project.
I bought these cups from the Dollar Store. You can twist the outer layer open and add your own design for the inside. I used the sheet of paper that came with the cup for a template and made my own background. On the snow layer at the bottom, I stamped the sentiment using My Craft Spot's Think Snow stamp set. I cut circles from George and Basic Shapes to create the snowman. I stamped the face with a Peachy Keen stamp and hand cut the scarf. I also created a tag for it by cutting the travel cup from Love You A Latte. I stamped the "to and from" from My Craft Spots Stampin' Around Christmas stamp set. I added a punched snowflake with a brad center and tied it on with some twine. 
I plan on putting a Starbucks gift card inside the cup and give it as a gift. 
I hope you all are having a great weekend and thanks for stopping in! 
SUPPLIES
My Craft Spot- Stampin' Around Christmas and Think Snow stamp sets, Twisted Lime Trendy Twine
Peachy Keen- PK-520 Winter Face Assortment
Cricut- George and Basic Shapes and Love You A Latte

Friday, December 7, 2012

Happy Christmas


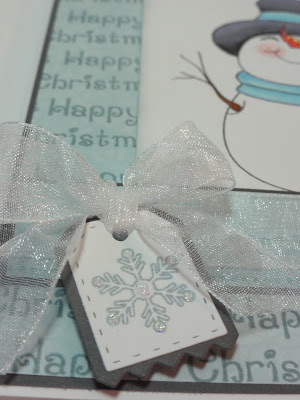
Hello everyone! I wanted to share the card that I made for Peachy Keen's Release Party challenges going on right now. For this challenge you were to use a word background and a snowman as your focal point. 
I stamped the background with the "Happy Christmas" stamp from My Craft Spot's Mistletoe stamp set. The snowman was stamped from Peachy Keens Happy Snowman With Label and I colored him with Copic markers. I made the tag using My Craft Spot's Tiny Tags Dies and stamped the snowflake from Peachy Keen's Snow Gifts stamp set. I tied it on with some sheer ribbon and added some stickles to it. 
I hope you all have a great weekend and thanks for stopping by. 
SUPPLIES
My Craft Spot- Mistletoe stamp set and Tiny Tags Dies
Peachy Keen- PK- 149 Keens Happy Snowman With Label and PK- 148 Snow Gifts

Wednesday, December 5, 2012

Merry Christmas Deer


Hello everyone! I have a quick card to share with you today! I am trying to get as many Christmas cards done as possible!
I stamped and colored the deer using Peachy Keen's November SOTM kit. I fussy cut the poinsettia from the decorative paper I used and pop dotted both layers. I cut a sentiment tab and used my corner punch to round the corners and stamped the sentiment using My Craft Spot's Mistletoe stamp set. To finish I added a sheer bow.
I hope you all liked my card and thanks for stopping in. Have a great day!
SUPPLIES
My Craft Spot- Mistletoe stamp set
Peachy Keen- PKSC-11 November SOTM kit
My Minds Eye Oh Christmas Tree Paper Pad

Monday, December 3, 2012

How Much Longer Must We Wait?


Hello everyone! It's time for a new challenge at My Craft Spot. This week the challenge is Merry Christmas...get started on those Christmas cards!
For my card I cut the santa from Doodlecharms. I stamped the face with a Peachy Keen face stamp and added some sparkly fluff to his hat and mustache. The background mat was embossed with the Poka Dots Cuttlebug folder and I matted it in green. I cut strips of paper for the sentiment tabs, used my corner rounder on the corners and stamped the sentiments from My Craft Spot's Mistletoe stamp set. To finish I added some Toadally Green crinkle ribbon around the card and tied a bow.
I hope you will all play along this week and please don't forget to check out the other great projects from the DT. Have a great day!
SUPPLIES
My Craft Spot- Mistletoe stamp set and Toadally Green crinkle ribbon
Peachy Keen- PK-483 Winter Wonderland Faces
Cricut- Doodlecharms
Poka Dot Cuttlebug folder

Saturday, December 1, 2012

Merry Mouse Shape Card


Good morning everyone! Here is the card that I made for Peachy Keen's challenge. This week the challenge is "Just Cards" Shape It Up.
This card came out SO cute! I cut the mouse at 5 inches from Create A Critter 2. I used 2 of the shadow cuts and welded it in CCR to create the card base. I stamped the face using Peachy Keen's Here Kitty Kitty for the eyes and the Cornies for the mouth. I inked the cheeks and added some white freckles. I also added some Glossy Accents to the eyes and nose. On the hat I added some Sparkly Fluff, pop dotted the ball, and added a flower that I created using punch's. 
The wreath I also created with punch's and My Craft Spot's Tiny Doilies Dies. I layered a white and red die and then punched snowflakes with a punch. I cut the snowflakes apart and glued them to the back of the Tiny Doilies Dies. To finish I stamped the sentiment and added a twine bow. 
I hope you all are having a great weekend and thanks for stopping in!
SUPPLIES
My Craft Spot- Tiny Doilies Dies, Mistletoe stamp set, and Maraschino Red Twinery Twine
Peachy Keen- PK-110 Here Kitty Kitty and PK-293 Cornies
Cricut- Create A Critter 2
Snowflake and flower punch