Showing posts with label Create A Critter 2. Show all posts

Wednesday, April 24, 2013

Day 3 Of My Craft Spot's Release Week


Hello everyone and welcome to day 3 of My Craft Spot's Sneak Peeks! Everyday this week there will be lots of fun projects to see and giveaways each day! We will be having a blog hop on Saturday along with the full reveal of all the new stamp sets! We ALL will also be giving away 1 of the new stamp sets at each blog in the hop!

Today we are giving sneak peeks of the new Ticket Dies and Tickets stamp set. These ROCK! I can't wait for you all to see the full reveal of these!

I cut the lion from Create A Critter 2 and stamped his face with a Peachy Keen Happy Go Lucky Dog face. Yes, a dog face on a lion! LOL! I cut out the row of tickets using the new Ticket Dies and stamped them using the new Tickets stamps. I also cut out the big ticket and stamped the sentiments on there too using brads on the sides to secure it down. To finish I added some Pink Sorbet Twinery Twine.

Thanks for stopping in today and I'll be back for Day 4 tomorrow. Don't forget to go to My Craft Spot for the daily prize and the other projects from the DT.  Have a great day!

Friday, March 22, 2013

Hoppy Easter


Hello everyone and happy Friday! I am SO sick of winter! It has been SO super cold here. We have been lucky if it hits 40 degree's...which it hasn't in almost 2 weeks. IT'S SPRING for pete's sake! LOL!

I have a card to share today that I made for Easter. I know alot of you like to see my Cricut creations and I will keep alternating with my Cricut and Cameo. I just had to create something with this adorable chick from Create A Critter 2.
I cut the card base from Birthday Bash and the grass from Paper Doll Dress Up. The eggs were cut from Doodlecharms and I hand cut one in half to make it look like it cracked. The chick was cut from Create A Critter 2 and I stamped the face with a Peachy Keen's Winter Wonderland face stamp. The bunny hat is the accessory for this cut. To finish I used My Craft Spot's Tiny Doilies Dies to create the sentiment flower and stamped the sentiment using Peachy Keen's Baby Easter Bunny stamp set. 
I hope you all like my card and thanks for stopping in. Have a wonderful weekend.

I am going to enter this card into the following challenges:
BBTB2- Egg-ceptional Easter Eggs
Craftin Desert Diva's- Easter Eggstravaganza

SUPPLIES
                       PK-193 Baby Easter Bunny
My Craft Spot- Tiny Doilies Dies
Cricut- Birthday Bash, Paper Doll Dress Up, Create A Critter 2, Doodlecharms


Saturday, February 9, 2013

You're Purr-fect!


Hello everyone! I have one of my last Valentine card to share with you today! I love My Craft Spot's Valentine's stamps. They are so fun and versatile. Did you know that most of the sentiments are broken up so you can create any kind of sentiment phrase you want. For example, the sentiments I used on this card could easily be used for a Thank you card or any other kind of kitty card because the "Valentine" is not connected!
Here is the set that I used on this card:

I cut the kitty from Create A Critter 2 and did not add her tiara. I also added some brown spots with scrap paper that I cut by hand and stamped the face with Peachy Keen's Here Kitty Kitty faces stamps. AND, did you notice....I gave her a tail! I don't know why these cuts never include a tail! I did this in my Gypsy by welding a J from George and Basic Shapes to her. I also gave her a collar and used my I-ROCK to apply some gems to it.
The rosette is cut from Ribbons and Rosettes and I added a pink gem to the center. To finish, I stamped the sentiment from My Craft Spot's Build A Valentine stamp set.
I hope you all liked my card and thanks for stopping in. Have a wonderful day!

SUPPLIES
My Craft Spot- Build  A Valentine stamp set
Peachy Keen- Here Kitty Kitty Face Assortment
Cricut- George and Basic Shapes, Create A Critter 2, and Ribbons and Rosettes
I-ROCK and gems


Monday, January 7, 2013

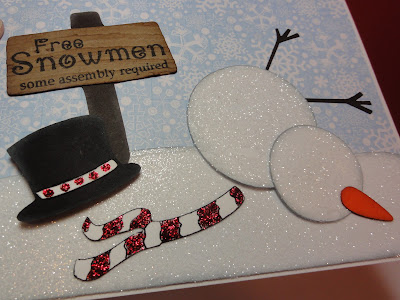
Free Snowmen


Hello everyone! We're getting back to normal after the holidays with a new challenge at My Craft Spot! This week the challenge is "Frosty Days" Winter themed projects. 
I was inspired to make this card from the sentiment. It's such a fun sentiment and couldn't wait to do something with it. 
I used quite a few different Cricut carts in this card...thank goodness for my Gypsy!
The circles for the snowman were cut  from George and I hand cut the arms. The carrot and scarf were cut from Winter Frolic and I hand drew in the lines for the scarf and added stickles. The hat was cut from CAC2 and the sign from Freshly Picked. I stamped the sentiment from My Craft Spots Think Snow stamp set and then embossed it with the Tim Holtz Woodgrain folder. To add some shimmer to this card, I added glitter to the snowman and snow layer at the bottom. 
I hope you all will play along this week and please don't forget to check out what the rest of the DT has created! Have a great day!
SUPPLIES
My Craft Spot- Think Snow stamp set
Cricut- Create A Critter 2, Winter Frolic, Freshly Picked, and George and Basic Shapes
Tim Holtz Woodgrain embossing folder
Stickles and glitter

Monday, December 10, 2012

Gingerbread Gift Set


Hello everyone! It's time for a new challenge at My Craft Spot. This week the challenge is "Wrap It Up" Create a box/ bag- gift packaging.
I made a gift set for this project. I wanted to include a card for this too, so I did. :) 
I cut the box from TBBM2  and the gingerbread man from Create A Critter 2. I stamped the gingerbread faces using a Peachy Keen face and used a white gel pen for the dots. I also added a twine bow to them too. 
On the card I used my sewing machine a did a stitching line around the mat and heat embossed the sentiment. For the box I added some hearts that I cut in Cricut Craft Room and stamped the sentiment on the box lid. 
I hope you'll all play along and please don't forget to check out what the rest of the DT had created for your inspiration. Have a great day!
SUPPLIES
My Craft Spot- Joy To The World stamp set and Peppermint Stick Trendy Twine
Peachy Keen- PK-520 Winter Face Assortment
Cricut- TBBM2 and Create A Critter 2

Saturday, December 1, 2012

Merry Mouse Shape Card


Good morning everyone! Here is the card that I made for Peachy Keen's challenge. This week the challenge is "Just Cards" Shape It Up.
This card came out SO cute! I cut the mouse at 5 inches from Create A Critter 2. I used 2 of the shadow cuts and welded it in CCR to create the card base. I stamped the face using Peachy Keen's Here Kitty Kitty for the eyes and the Cornies for the mouth. I inked the cheeks and added some white freckles. I also added some Glossy Accents to the eyes and nose. On the hat I added some Sparkly Fluff, pop dotted the ball, and added a flower that I created using punch's. 
The wreath I also created with punch's and My Craft Spot's Tiny Doilies Dies. I layered a white and red die and then punched snowflakes with a punch. I cut the snowflakes apart and glued them to the back of the Tiny Doilies Dies. To finish I stamped the sentiment and added a twine bow. 
I hope you all are having a great weekend and thanks for stopping in!
SUPPLIES
My Craft Spot- Tiny Doilies Dies, Mistletoe stamp set, and Maraschino Red Twinery Twine
Peachy Keen- PK-110 Here Kitty Kitty and PK-293 Cornies
Cricut- Create A Critter 2
Snowflake and flower punch

Monday, November 12, 2012

Baby, It's Cold Outside! And A WINNER


Hello everyone! I wanted to share this super cute tag with you that I made for a challenge at Peachy Keen over the weekend. This challenge was to "Make A Tag" and this is what I came up with!
I hand cut the tag and it's layers and stamped the notebook paper onto the blue mat using Peachy Keens August SOTM kit. The snowman I also hand cut. I cut an egg shape, squared it to the side,  and added the scarf. The hats are cut from Create A Critter 2 and I pop dotted the top one. I stamped that adorable face using Peachy Keen's Winter Wonderland Face Assortment and colored it with Copic markers. I added some Glossy Accents to the eyes and glitter freckles to the cheeks. The snowflake is a punch that I added glitter to and also added glitter dots on the background. To finish I stamped that fun sentiment and added a crinkle ribbon bow with a button and jute string center. 
I also wanted to announce the winner of the Think Snow stamp set! Random.org chose #20.....


Blogger Sue D said...
Very cute set of bear cards--I like all the outfits and the twine pom poms.
Congrats Sue D  Please contact Kimberly at My Craft Spot letting her know what you won and that it was from The Cricut Bug! 
Thank you all so much for the wonderful comments all week long! Have a great day!
SUPPLIES
My Craft Spot- Think Snow stamp set, Cranberry Crinkle Ribbon, and Ivory Jute String
Peachy Keen- August SOTM kit and Winter Wonderland Face Assortment
Cricut- Create A Critter 2

Thursday, November 8, 2012

Day 4 Of My Craft Spot's Release Party


Hello everyone! Day 4 of My Craft Spot's sneak peeks, and only 2 days until the full release and BLOG HOP!!! Are you getting excited yet? Make sure you go over to My Craft Spot everyday this week for a daily prize. And come back on Saturday for the Blog Hop where you could win a new stamp from each blog in the hop!
Today we are showing sneak peeks of the the new Think Snow stamp set. This one I will say is a MUST for the winter season! So many fun sentiments on this set!
I cut the snowman from Create A Critter 2 and stamped the face with a Peachy Keen face. The hat I cut an extra one, glittered it up, and mounted it with a pop dot. I also added some brads to his belly and Glossy Accents to his eyes and cheeks. The snowflakes in the corner I punched and glittered. I added them with a brad as well as the sentiment banner. I stamped that fun sentiment from the new Think Snow stamp set. 
Thanks for stopping in today and don't forget to head over to My Craft Spot for the daily prize and more fun projects. Have a great day!
SUPPLIES
My Craft Spot- Think Snow stamp set
Cricut- Create A Critter 2
Peachy Keen- Winter Wonderland Faces

Thursday, October 11, 2012

Tomb It May Concern


Hello everyone! I have a card to share with you that I did for a couple of challenges.
1. Simply Crafts- Use bat from Create A Critter 2
2. Little Scrap Pieces- Any Halloween project
3. Paper Playtime- Trick Or Treat + Die cut or Punch
I cut the card base and mat layer at 5 inches from Birthday Bash. The bat, moon, fence, and tomb were cut from Create A Critter 2. I added a second layer pop dotted to the bat and decided to stamp his face with a FUN face, as apposed to a scary one. I think it's cute as can be! LOL! The grass was cut from Paper Doll Dress Up and I also pop dotted it. I inked the tomb and stamped the sentiment which is from My Craft Spot's Best Witches To You stamp set. 
Thanks for stopping in and have a great day!
SUPPLIES
My Craft Spot- Best Witches To You stamp set
Peachy Keen- Cornies Face Assortment
Cricut- Create A Critter 2, Birthday Bash, Paper Doll Dress Up

Tuesday, October 9, 2012

Surprise Kitty In Pumpkin Tutorial

Hello everyone! Well as promised, here is the tutorial for the Surprise Kitty In Pumpkin. If you did not see the original post, you can see it HERE
First I will give you a list of the cuts and sizes:
All cuts are from Create A Critter 2
1. Kitty cut at 2 inches- stamp face with PK face (optional)
2. Pumpkin cut at 3 inches
3. Fence cut at 4.5 inches
4. Grass cut at 2 inches X 2
5. Clouds and moon cut at 3.5 inches

Now you will need to cut the center piece out of fence, the top of the base piece of the pumpkin, and the kitties legs/tail. You will also need to punch a small hole in center bottom of kitty for brad placement. Use above picture as reference.

To create the card front you will need to cut a 4 X 51/4 inch piece of paper and using a circle punch, punch a semi-circle in the top. This will allow for the tag pull. You will also need to cut an 1/8 wide slit from the center bottom up 1 inch to 2 1/8 inch. 
The tag is cut at 3 X 4 1/2 and you will need to punch a small hole in the center 1/4 inch up from bottom center. Use above picture as reference. 
The back of the card front
To assemble these pieces you will need a 1/2 X 7 inch strip of lightweight paper for the support band seen in picture above. I used a piece of printer paper. You will fold it loosely around the tag and glue closed. Glue this piece to the center back making sure it is positioned below punched semi-circle. Slide the tag into the support strip and add a brad through the punched hole and slit. 
Turn card around and thread brad through kitty cut and secure brad closed. Stamp sentiment onto tag and add an eyelet to tag and thread ribbon through for the pull. Glue your card front to a standard A2 sized card ( 4 1/4 X 5 1/2) gluing only along sides and bottom. Make sure to leave top open. I also made sure to glue 1/4 inch outside along the edges of slit to just to reinforce it from ripping. Now your ready to decorate!

I started with the fence and you will have to slide it under the kitties head. Then I added the pumpkin gluing only the bottom and about 1/3 way up sides with the kitties head in the down position. This will ensure they will line up. Then I added the rest of the pieces and stamped the sentiment on the front!


I hope you all understand my tutorial and if you have any questions, please ask! Have a great day and thanks for visiting!

Friday, October 5, 2012

Surprise Kitty In Pumpkin


Here is a video of the card in action. Sorry, I couldn't get the whole card in the video :(


Hello everyone! I have a super fun card to show you today! I worked on this card for awhile and am happy to say that it turned out JUST LIKE I WANTED! YAY!
When I saw the kitty and pumpkin in the new Create A Critter 2 cart, I thought....that would look so cute if the kitty could pop up out of the pumpkin. So I combined my knowledge of the Surprise Pop Up Card and created this one. When you pull on the tag, the kitties head comes out of the pumpkin. I am working on a tutorial for all of you, but just so you know the tutorial will be for these cuts in particular. This is a custom card and if you use different cuts, the placement would be different. But it will also give you an idea of how this card is assembled. The possibilities are endless with this technique. I could see a bear coming out of stocking, a chick coming out of an egg, or a jack in the box, for example.
All of the cuts on this card are from the Create A Critter 2 cart. I cut out the moon and glittered it up. The kitties face was stamped using Peachy Keen's Misty Sue from the sampler package of faces. The sentiment on the front and tag are from My Craft Spot's Best Witches To You stamp set.
I am going to enter this into the following challenges:
My Craft Channel- Challenge #1 The Gh'oul Times
Peachy Keen- Anything Goes
Have a great weekend and thanks for stopping in!
SUPPLIES
My Craft Spot- Best Witches To You stamp set
Peachy Keen- Sampler Package Of Faces
Cricut- Create A Critter 2

Monday, October 1, 2012

Guest Designer For Exploring Cricut

Hello everyone and welcome to The Cricut Bug! Today I am Guest Designing for Exploring Cricut!
I made this fun card to show you today using the NEW Create A Critter 2 cartridge. 


All of the cuts were cut from Create A Critter 2. I cut the owl at 3 inches and "glammed" her up! I did this by covering the colored pieces with glitter and then added Glossy Accents over the top to seal in the glitter and give it lots of shine. The banner was also cut from CAC2 from the Patriotic Dog page and I trimmed it down to 3 pennants. I added a white stitching line and hand drew the "BOO". I also added some glitter to the orange. The side was embossed with the skeleton scroll Cuttlebug folder and I added glitter to this as well. The spider web is a MS punched border strip and I heat embossed the sentiment which is from My Craft Spot's Happy Haunting stamp set. 
I just want to say thank you to the awesome crafters at Exploring Cricut for letting me Guest Design for them! Please go and check out the great projects they have created! 
Thanks for stopping by and have a great day!
SUPPLIES
My Craft Spot- Happy Haunting Stamp Set
Cricut- Create A Critter 2
Skeleton Scroll Cuttlebug Folder
Martha Stewart Spider Web Border Punch