Sunday, April 29, 2012

Thank You Dragonfly


Hello everyone! I am sorry that I have been MIA the last couple of days. I have been re-decorating my bathroom and getting things ready for my son's graduation party.
I am going to start "blogging" a little different. I have been using so many stamps that my posts get really long, so I am going to start adding a supply list at the bottom of my posts. I see so many others like this and it seems to be easier for me and for my faithful followers to understand.
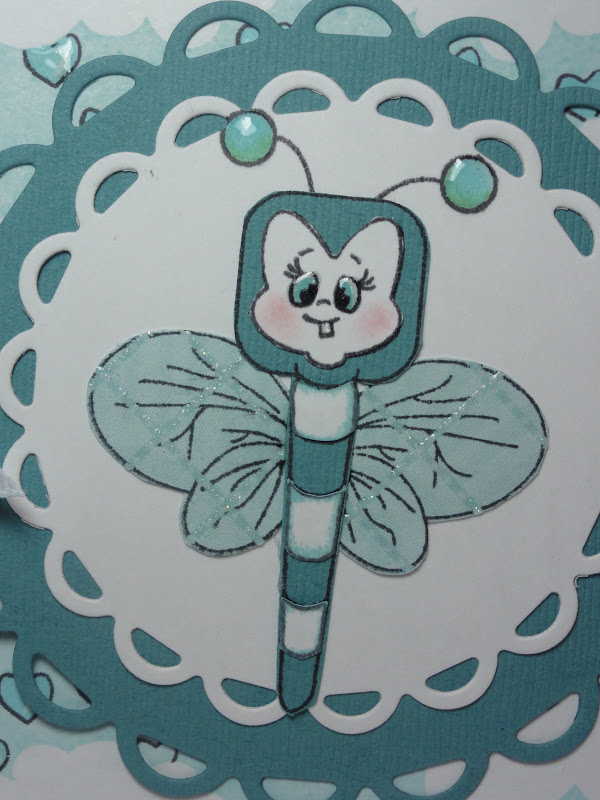
I stamped the background clouds twice. One for the main background and the second so I could cut the clouds out and use them as a mask.( My little tip for this is to # the pieces and keep them in a plastic bag so you only have to do this once!) After the cloud pieces were cut out I glued them over the stamped background using re-positionable glue. I then stamped the hearts over the entire background. I then removed the cloud mask's and colored the hearts with a copic marker. I also added a white highlight to them and Glossy Accents.
The dragonfly was stamped and paper pieced. I changed up the face and used a Cornies face instead. I mounded her to mats that are from the Nestibilities Lacy Circles. I also added Glossy Accents to the eyes, tooth, and antenna. To finish I tied a bow and stamped the sentiment.
Supplies:
Peachy Keen stamps- Faceless Bugs, Cornies Faces, Clouds Background, Valentine Cupids, Vivienne and Friends
Nestabilies- Lacey Circles
Copic Marker- B00 Frost Blue
Glossy Accents

I am going to enter this into Peachy Keen's challenge this week which is Cards only and create your own stamped background.
Thanks for looking and don't forget that I will be picking the winner for the PK Clouds Background on Tuesday! Have a great day!

Thursday, April 26, 2012

Ladybug


Happy Hello everyone! I have a super cute card to show you today! Here I am in my craft room when I REALLY need to be working on things for my son's graduation party which is now less than a month away!!! LOL! Gosh! I am such a procrastinator!
I really like how this card turned out! The papers just worked perfect! I cut the fancy frame from Elegant Edges with the matching mat and pop dotted it to the card. The ladybug was cut from Paisley and I pop dotted the wings just on the bottom edge, gluing the top down. I love the look it gives the ladybug, like she's going to take off. The background bottom was embossed with the Cuttlebug Seeing Spots folder and I punched a border strip to separate the 2 papers. I added a ribbon down the side with a sentiment banner. The banner is held down with a brad which I gathered the ribbon into the center with.
Have you all seen this trick? I hadn't and I LOVE IT!!! It makes it SO easy to create sentiment banners!
Just use a square punch to punch out the corners! Easy Peasy! LOL!
I am going to enter this card into the following challenges:
1. RRRR- Black, White, and 1 accent color + ribbon
2. BBTB2- Ladybug or Bee
Thanks for looking and have a wonderful day!

Tuesday, April 24, 2012

Hello Kitty Car Card


Hello everyone! I have a fun card to show you today that I did for a couple of challenges! I have a trick to share too!
I cut the car card shape from Hello Kitty Greetings and all the front layers. I cut 2 layers of the car front, wheels, light, Hello Kitty's arm, and bumper and pop dotted it to the original layers to get lots of dimension. I hand cut the sentiment banner and stamped the sentiment from My Pink Stamper's Boy Crazy stamp set.
My trick I want to share today is how the sentiment banner folds up! I love making cards like this but they're not very friendly when you try to put them into an envelope. Or you have to make custom envies for them. I made mine so it will fold up and fit into an A2 sized envelope.
I did this by mounting the sentiment banner to a brad that is sandwiched in between the layers. With the pop dots, it will move freely. So before I adhered the front car to the card base, I punched a hole under the back layer of the car and secured the banner to the car with a brad. Then I glued down the front to the card base, but not gluing around that side of the car or brad. This way it will move freely and you can fold it up!
I am going to enter this card into the following challenges:
1. My Craft Spot- Things That Go- Cars, planes, boats, etc.
2. Fantabulous Cricut- On The Go!- cars, planes, bikes, etc.
3. Little Scrap Pieces- Pink and or Purple
Thank for stopping in and taking a look! I hope you all understood my trick that I shared today. Have a great day!

Saturday, April 21, 2012

Cruise Survival Kit


Hello everyone! I have a fun project to show you that I did for my Sister In Law...aka...my best friend. She is going on her first cruise next week for work. She gets PAID to go on a cruise! Lucky duck! LOL! This is a "just for fun" send off for her.
I made this Cruise Survival Kit for her. I cut the tote bag from TBBM and added some decorative paper and ribbon to it. The octopus was cut from Create A Critter and I stamped the face with a Peachy Keen Wide Eyed Kids face. The sentiment tag was printed off my computer and I used circle punches to get the tag. The inside is where I had lots of fun! I cut the sun and garbage can from Smiley Cards and stamped the faces with PK Happy Lashes and Happy New Year assortment. The bottle was cut from Slumber Party and I stamped the face with a PK Happy New Year face. The lip balm tag I cut by hand and stamped the lips and sentiment from PK's Kiss Me Leprechaun set. I hand wrote a little note on the back of each tag, all starting with " SO YOU DON'T..."
The sun/sunblock- "Get Scorched!"
The garbage can/pocket bac- "Catch Some Crazy Virus!"
The bottle/drink sticks- "Get Parched!"
I love how this turned out and I think it is so funny! I know she's going to love it and get a good laugh out of it too.
I am going to enter this into Peachy Keen's challenge this week which is a color inspiration from the following picture:
Have a great weekend and thanks for looking!

Friday, April 20, 2012

Baby Rattle Card


Hello everyone! Here is a baby card that I made for Scrappy Mom's Terrific Tuesday challenge which is anything on a stick. I used the bear rattle from Baby Steps and am not quite sure if it LOOKS like a rattle! LOL!
Like I said, I cut the rattle from Baby Steps and stamped the face with a Peachy Keen Wide Eyed and Bushy Tailed face. I cut the stick off of a sucker, covered it with twine, and added a bow. The side pink strip was punched with a Martha Stewart border punch and I embossed the background with the Poka Dots Cuttlebug folder. The sentiment is printed off my computer and I hand cut the tag. To finish I added buttons to the bear's head and the sentiment tag.
I hope you all like my card and thanks for looking! Have a great day!

Thursday, April 19, 2012

Wishing You A Beautiful Day!


Hello everyone! Here is a card that I made for a couple of challenges. I LOVE how cute the flower turned out! Hee Hee!
I started by stamping the background with the PK Clouds Background. ( I REALLY love this cloud stamp!) I cut the flower petal layers from Mother's Day Bouquet and hand cut the stem and leaves. For the center of the flower I used my I-Top and covered a brad in yellow paper and then stamped the face which is from the PK Happy Lashes set. I folded out the top layer of petals to give it lots of dimension. The sign was cut from Freshly Picked and the grass from Create A Critter. I added a ribbon and stamped the sentiment which is from Whimsical Designs Whimsical Fun Vol.1.
I am going to enter this into the following challenges:
1. EAD Color Designs- Color Challenge
2. Die Cuttin Diva's- Gardens
3. Little Scrap Pieces- Use a Flower

Wednesday, April 18, 2012

Birthday Mouse


Hello everyone! Here is a card that I made for a couple of challenges. I'm still playing with my new PK stamps! LOL!
The mouse was stamped and paper pieced from the PK Valentine Cupids and I colored it with Copic Markers. I also added some Glossy Accents to his nose and mouth. The balloons were cut from Birthday Bash and I outlined them in black pen and mounted them on pop dots. The balloon string was stamped and I also stamped the sentiments which is from the PK With A Cherry On Top set.
I am going to enter this into the following challenges:
1. BBTB2- Balloon and Birthday, must use Cricut cut balloons
2. Paper Playtime- Birthday card with sentiment
3. My Craft Spot- Make It Pop, use dimentionals
Thanks for looking and have a great day!

Sunday, April 15, 2012

Peachy Keen Bee Card


Hello everyone! I am BACK and I'm packin'.....Peachy Keen Stamps that is! LOL! We got back this afternoon and after the 8 hour drive I just wanted to stand up for awhile, but my Peachy Keen stamps were calling! It about drove me CRAZY that I received them in the mail an hour before we left for out trip! I had to leave them sitting on my desk...GASP! LOL! So this is the card that I created as soon as I got home.
This was the first time I ever paper pieced. I have been in the dark about this technique for some reason and decided to try it. I stamped the bee which is from the PK Faceless Bugs set on different colors and cut them out. I stamped the background with the new PK Clouds background and stamped the bee's antenna, swirl, and loopy's directly over the top. I added the bow and stamped the sentiment which is from the PK Valentine Cupid's set. I also finished the inside with more loopies and the sentiment which is from the PK With A Cherry On Top stamp set. YES, I did go a little stamp crazy on this card! LOL!
I am very happy to be home and back in my craft room. Don't forget that I am giving away one of those FABULOUS PK Cloud Background stamps HERE.
I am going to enter this into the following challenges:
Peachy Keen- Anything Goes
My Craft Spot- Inside and Out- must include a sentiment on the inside and outside of the card
Thanks for looking and have a great night!

Friday, April 13, 2012

THANK YOU GIVEAWAY!!!!

Hello everyone! I have been VERY fortunate this last month is winning stuff so I wanted to give something back! This is also a chance for me to say thank you to my FANTASTIC followers who leave THE sweetest comments and the awesome people I have won things from. First I want to say THANK YOU to Jayne of Jayne Designs for winning the TBBM2 cart! I wanted this cart SO bad and was ecstatic when I found out I won! THANK YOU Jayne!!
Secondly is Peachy Keen! I won a $50 gift certificate for their April Release challenges! THANK YOU PEACHY KEEN!!! Again, I was ecstatic! So when I put my order in, I ordered 2 of these AWESOME new background stamps. One for myself and one for a lucky follower! This looks like THE coolest stamp and I can't wait to use it! I am always looking for cloud backgrounds for my cards and this is perfect. It will fit an entire A2 sized card!

Here is what you have to do to be entered into my giveaway:
1. Please be a follower....This is only fair since this is a THANK YOU to my fabulous followers
2. Leave a comment on THIS post and a way for me to contact you if you win
3. For an extra chance, post about this giveaway on your blog/sidebar and leave a comment saying you did
I will choose a winner on May 1st and announce it here on my blog!

Good luck everyone and THANK YOU from the bottom of my heart for all the sweet comments you leave! Have a great weekend!

Wednesday, April 11, 2012

Just Because Frog


Hello everyone! Here is a card that I made for several challenges. I am trying to get some time in my craft room before the weekend. After that I will be in a car....BLAH! My son has his registration for college and the drive is 7 1/2 HOURS! So unfortunately I will be stuck in a car for most of the weekend.
For my card I cut the frog and umbrella from the Paisley cart. I hid the butterfly for the umbrella and did a stitching line.  Do you see that UBER adorable paper I used? When I saw that paper which is from the Doodlebug Sugar and Spice pad, I knew I wanted to use it on the umbrella! Those little frogs are too cute! I stamped the face on the frog using Peachy Keen Critter faces for the eyes and Everyday Character Face Parts for the mouth. I omitted the heart on the belly and added a flower button instead.  To finish I added the ribbon and stamped the sentiment. I am going to enter this into the following challenges:
1. Celebrate The Occasion- Just Because and must use pink
2. Simply Crafts- Umbrella from Paisley
3. Paper Playtime- Umbrella
4. Fantabulous Cricut- Buttons and Bows

Tuesday, April 10, 2012

Wish Big!


Hello everyone! Here is the card that I made for Peachy Keen's sketch challenge. Before I get into the details of my card I just want to give a BIG shout out to Peachy Keen! I won the grand prize for the April Release challenges and I want to say THANK YOU PEACHY KEEN!!! You ROCK and so do your stamps! I am SO excited that I can buy more of your super cute stamps!
I made my card by following the sketch above. The cupcake was cut from Simply Charmed and I stamped the face with a face from the Happy New Year Assortment. (This is one of my all time favorite faces!!! Hee Hee!) I colored the face with Copic markers and used a white gel pen for the highlights. I inked all the edges of my cuts and I did a faux stitching line around the card and mat.. The banner I cut by hand and stamped the letters, including the "BIG" at the bottom. To finish I added a ribbon, some twine on top of the banner, and some bling.
I am also going to enter this into the Go Fish Challenge.
Thanks for looking and have a great day!

Monday, April 9, 2012

Monkey Pick Me Up


Good morning everyone! I hope you all had a wonderful Easter! I ate WAY too much, but enjoyed spending time with my family. It also happened to be my anniversary yesterday.
Here is card #2 for the PK Connection challenges. This one was a sketch challenge
The monkey was cut from Life's A Party and I stamped his face with a PK Wide Eyed and Bushy Tailed face stamp. The oval mats were cut from Plantin Schoolbook. I hand cut the sentiment banners and stamped all the sentiments from Whimsical Designs
I hope you all have a great day and thanks for stopping by!

Friday, April 6, 2012

Peachy Keen April Release Challenge #1


Happy Friday everyone! Here is the fun card that I made to enter into the Peachy Keen April Release challenges. There is 2 challenges. The first one is to use the color peach and the second is a sketch. You can find them on the PK Connection.
This card is for challenge #1- use the color peach. I cut the popsicle from Simply Charmed and stamped the face with a Cornies face stamp. You can't really see in the pictures, but I also covered the whole thing with Glossy Accents. I did a faux stitching line around the card and mat and added the BIG pink bow. Gotta love that bow! LOL! To finish I stamped the sentiment which is from Whimsical Designs Whimsical Fun Vol. 1.
I hope you all liked my card and thanks for looking! I will be back for the 2nd challenge project sometime this weekend. Happy Easter everyone!

Thursday, April 5, 2012

Patchwork Bee Card


Hello everyone! Here is a card with matching envelope that I made. I learned a new trick and I will share it with you!
When I decided that I wanted to make this card using the bee from Create A Critter, I thought....4 bee's at 1.5 inches....that's a lot of little pieces. So I tried something in CCR and it worked! I added all the pieces for the bee to my mat and filled them with colors from Lori's Garden. I made a copy of the wings and the head/belly piece and had to hide one wing on one cut and the opposite on the other copy so I could layer them. Otherwise you have the set of wings, but they don't match up. I then layered all the pieces in the order that they go and clicked the Don't Weld button for each piece. This way I ended up with a fully colored bee without having to cut all the layer's separately. I also hid the face so I could stamp those cute PK faces on them. Here is what it looked like after I printed them only, no cutting.
The only downfall to this technique is that you can't cut them. I tried and it will cut each piece out so you're left with a mess! LOL! But if you're looking to put something like this on a white background, it's a great trick! Ok, now I'll explain how I made the card and envelope....sorry this is such a long post!
I printed the bee's from Create A Critter and stamped the faces with Peachy Keen's Cornies faces. The frames were cut from Accent Essentials and I cut an extra one for a template. With the template frame, I lined it up over the bee where I wanted it and traced it. I then cut the bee into a square 1/8 inch smaller than the frame and glued the frame to the bee square. The flowers were cut from Mother's Day Bouquet and I added brads to the centers. For the center one I stamped the sentiment. I made the matching envelope using a framed bee, a decorative strip of paper which I added a punched border to.
I hope you all understand my directions for doing this technique. Essentially you are just printing your otherwise cut image. I am going to enter this into the following challenges:
1. Die Cuttin Diva's- Sketch
2. The Paper Variety- Card with matching envelope. Envelope must include 2 different elements.
Thanks for looking and have a great day!

Tuesday, April 3, 2012

"Hoppy" Bunny


Hello everyone! I have another Easter card to show you that I did for a couple of challenges. I just love how this card turned out. It reminds me of the old Peter Cotton Tail books.
The decorative mats were cut from Elegant Edges and so was the bunny. I stamped the eye on the bunny with a Peachy Keen Cornies face stamp and did some highlighting with a black pen. The basket was cut from Doodlecharms and I also used the black pen on here for the details. The grass and fence were cut from Paper Doll Dress Up and I stamped the sentiment which is from Scrappy Mom's Furry Friends set. To finish I added a crinkle ribbon bow and added a rose that was cut from Flower Shoppe.
I am going to enter this into the following challenges:
1. My Craft Spot- Challenge #50: Easter
2. Scrappy Mom's- Terrific Tuesday challenge: Easter

Sunday, April 1, 2012

Wobble Wednesday Bunny


Hello everyone and happy Sunday! I have a card to show you today that I did for a couple of challenges. I found a new challenge blog and wanted to play! It's called Wobble Wednesday's and it's all about action wobbles. Your free to do any sort of project as long as it has an action wobble on it. FUN FUN FUN!
For my project I made this card. I miss-cut the blue mat for a different project that I made and loved the way it looked in this card, so I used it. It's cut from Once Upon A Princess. The bunny in the flower and extra flowers were cut from Baby Steps. I just love the cute little bunnies, bears, and chicks that can be found in the font sections of this cart! I always refer to them as the hidden gems! LOL! I stamped the bunny face with a Peachy Keen Ballin' Bunnies face from the Sampler Package of Faces. One of my all time favorite crafty items is the PK faces. In my opinion they add SO much character to an otherwise ordinary cut. Then again, if you visit my blog regularly, you already know how much I love my PK faces! :)
To finish I inked all the edges of the cuts and of course added my bunny to an action wobble. It was a little too big for my cut, so I trimmed in the sides so it wouldn't show. I wasn't sure if it would stay together, but it did! I also stamped the sentiment which is from Whimsical Designs Whimsical Fun Vol. 1 stamp set.
I am going to enter this into the following challenges:
1. Wobble Wednesday's- All about bunnies: Use an Action Wobble and a bunny
2. Little Scrap Pieces- My Favorite Things- use one of your favorite crafty items on your project
Have a wonderful day and thanks for looking!