Showing posts with label Accent Essentials. Show all posts

Monday, April 8, 2013

You Rock!


Hello everyone! It's time for a new challenge at My Craft Spot! This week the challenge is "Cute Critter". Create a project and include a cute critter.
I made this fun card to share with you today. I really wanted to get out of the norm and make a fun shaped card.
I cut the card base and mat from Life's A Party. I added a black stitching line around the outside and used my I-Rock to add some hot rocks to the corners. The fox was cut from Birthday Bash and I stamped the face with a Peachy Keen stamp. I think this face is PERFECT for this fun guy, with his tongue sticking out and all! LOL!
The arrow I created by welding the curved and straight arrows together from Accent Essentials. After it was cut out, I had to trim off the excess and added a white stitching line to it. The sentiment tag was created by using My Craft Spot's Lacy Banners Dies and the sentiment is from Tiny Tags 2.
I hope you will all play along in the challenge and please don't forget to check out what the rest of the DT has created! Have a great day!

SUPPLIES
My Craft Spot- Tiny Tags 2 and Lacy Banners Dies
Cricut- Birthday Bash, Life's A Party, and Accent Essentials
I-Rock and Pearl White Hot Rocks

Thursday, July 19, 2012

Sunshine


Hello everyone! I have a card to show you that I did for Fantabulous Cricut's challenge. This week the challenge is "Sunny Days" Make a project using a yellow sun.
I love sun's, so I couldn't pass up this challenge. I cut the sun from Everyday Paper Dolls and a circle for the center. I inked the edges and stamped the face with a PK stamp. The scallop strip was cut from Accent Essentials and I did some stitching lines. To finish I stamped the sentiment and added a bow. 
I hope you all like my card and thanks for stopping by! Have a great day!
SUPPLIES
My Craft Spot- Butterfly Kisses Stamp Set
Peachy Keen- Cherub Face Assortment
Cricut- Everyday Paper Dolls and Accent Essentials

Thursday, May 10, 2012

Crazy Ribbon Cupcake Card


Hello everyone! I have a fun card to show you today that I did for My Creative Time's Throwback Thursday challenge. The challenge is to make a birthday card using a cart that has balloons, cakes, party hats, cupcakes, etc. I used Straight From The Nest. I never realized until I really looked at it, just how many birthday cuts are on there. 
I made the card shape using Accent Essentials by welding to rectangles together and then adding the scallop borders. The background is embossed with Seeing Spots and I added diamond glitter dots to the scallops. The cupcake was cut from Straight From The Nest and I added lots of fun things to it. I didn't use the wrapper, but instead cut strips of paper and added twine to it. For the top I added Glossy Accents to the cherry and diamond glitter for the sprinkles. I also added that cool fringe and more diamond glitter to the bottom of the frosting. The banner I cut by hand, I stamped the letters, and used a white pen for the inside lines. I added more of that fun trim and wound twine around it. The mini tag was stamped and cut by hand and I added that amazing bow! How fun is that bow?! I found an awesome tutorial for it HERE.
I finished the inside by stamping the sentiments and cherry which are from Peachy Keen's With A Cherry On Top stamp set. I colored the cherry with Copic markers.
I hope you all like my card and thanks for looking! I hope you will come back on Monday because I have some super exciting news to share with all of you!  Have a great weekend!

Thursday, April 5, 2012

Patchwork Bee Card


Hello everyone! Here is a card with matching envelope that I made. I learned a new trick and I will share it with you!
When I decided that I wanted to make this card using the bee from Create A Critter, I thought....4 bee's at 1.5 inches....that's a lot of little pieces. So I tried something in CCR and it worked! I added all the pieces for the bee to my mat and filled them with colors from Lori's Garden. I made a copy of the wings and the head/belly piece and had to hide one wing on one cut and the opposite on the other copy so I could layer them. Otherwise you have the set of wings, but they don't match up. I then layered all the pieces in the order that they go and clicked the Don't Weld button for each piece. This way I ended up with a fully colored bee without having to cut all the layer's separately. I also hid the face so I could stamp those cute PK faces on them. Here is what it looked like after I printed them only, no cutting.
The only downfall to this technique is that you can't cut them. I tried and it will cut each piece out so you're left with a mess! LOL! But if you're looking to put something like this on a white background, it's a great trick! Ok, now I'll explain how I made the card and envelope....sorry this is such a long post!
I printed the bee's from Create A Critter and stamped the faces with Peachy Keen's Cornies faces. The frames were cut from Accent Essentials and I cut an extra one for a template. With the template frame, I lined it up over the bee where I wanted it and traced it. I then cut the bee into a square 1/8 inch smaller than the frame and glued the frame to the bee square. The flowers were cut from Mother's Day Bouquet and I added brads to the centers. For the center one I stamped the sentiment. I made the matching envelope using a framed bee, a decorative strip of paper which I added a punched border to.
I hope you all understand my directions for doing this technique. Essentially you are just printing your otherwise cut image. I am going to enter this into the following challenges:
1. Die Cuttin Diva's- Sketch
2. The Paper Variety- Card with matching envelope. Envelope must include 2 different elements.
Thanks for looking and have a great day!

Tuesday, August 30, 2011

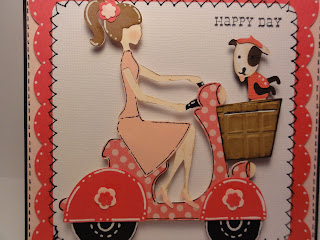
Happy Day


Hello everyone! Here is the card that I made for several challenges. The first is More Than Favors CCCC challenge which is to use Sweethearts. The second is for My Craft Spots Monday Challenge which is " Sew Much Fun" use some sort of stitching on your project.
 I want to take a second and give a BIG shout out to Kimberly at My Craft Spot! I won several items in her new stamp release blog hop this last week and I just want to say THANK YOU! If you haven't seen her new stamp sets you really need to check them out. They are SO CUTE and not to mention the FABULOUS inspiration she had on her blog all week long! The projects were AMAZING! So THANKS AGAIN KIMBERLY!
For my card I cut the scallop frame and mat from Accent Essentials. I used my sewing machine and stitched the black line around the white frame and used a white and black pen for the other stitching. I cut the girl on scooter from Sweethearts and used a white and black pen for highlights. I embossed the basket with The Paper Studio's Mesh Texture folder and added punched flowers to the scooter and the girls hair. The little dog was cut from Four Legged Friends and I put him in the basket and stamped the sentiment. I hope you all are having a great day and thanks for looking!

Thursday, July 21, 2011

No Monkey Buisness


Hello everyone! Here is the card that I made for More Than Favors CCCC challenge. This week the challenge is to use Sweethearts.
I made my card using the scallop square from Accent Essentials in my Gypsy by welding 2 together. For the mats I used the rounded square from George and Basic Shapes. One I cut slightly smaller for the mat. I cut the monkey from Sweethearts. I chalked all around his body and his cheeks. I used a white and black pen to do the highlights and mounted his face on pop dots. The bananas were cut from Smiley Cards and I chalked around the edges, used a white gel pen and a brown colored pencil for the hightlights. I also mounted the bananas on pop dots. To finish I did dots around the outside of the card, stamped the sentiment, and hung the monkey from some chocolate truffle twine.
I hope you all are having a great day and thanks for looking!

Monday, June 13, 2011

Fathers Day Gable Box


Hello everyone! Here is a gable box that I made for Fathers Day. I got the pattern for the gable box HERE. It prints the entire size of a 8 1/2 X 11 and is perfectly straight. An awesome pattern. I cut the window using Accent Essentials and my center point button on my Expression and also cut the matching frame. The bear badge was cut from Camping Critters at 1.5 inches. The sentiment I printed off the computer and I tied a crinkle ribbon bow ( From My Craft Spot) and attatched it with a metal brad. I think this turned out so cute and am very happy with the end results. Now I have to make 2 more! :)

I am going to enter this into the following challenges:

1. My Craft Spot- We Love You Dad!

2. More That Favors- CCCC Accent Essentials

3. Crazy About Cricut- Man/Boy Theme


Monday, May 2, 2011

Pagoda Card


Good morning everyone! Here is the card that I did for More Than Favors CCCC challenge. This week the challenge cart is Pagoda or Plantin Schoolbook. I cut the dragonflies from Pagoda at 2 inches. The Kanji symbols were cut at 1 inch. Their meanings are Beauty, Warmth, and Happiness. In case you didn't know, all the meanings for the symbols are on the same page under the Kanji Word tab. The frame was cut from Accent Essentials at 3 inches and I added a faux stitched line on the inside with my white gel pen.. To finish I embossed the background with the Cuttlebug Textiles folder and added a ribbon. I hope you all are having a great day!


Sunday, May 1, 2011

Baby Girl Card


Hello everyone! Here is the card that I did for My Craft Spot's Monday Challenge. This week the challenge is "Bundle Of Joy". Make a project to welcome a new baby. I cut the buggy with baby from Baby Steps at 2.5 inches. The frames were cut from Accent Essentials at 3 inches. I embossed the background with a Sizzix texture plate and stamped the sentiment. I hope you all are having a great weekend!


Friday, April 15, 2011

How Now Brown Cow!


Happy Friday everyone! Here is the card that I did for Tacky Tuesday's challenge. The challenge this time is any cow cut and use the words "moo" or "utter". The card and mat were cut from Accent Essentials at 5 inches and I welded 2 to make the card base. I cut the brown cow from Paper Doll Dress Up at 3 inches. I cut 3 layers, a light brown, a pink, and a dark brown and cut and layered them. I stamped the eyes with a Peachy Keen stamp and highlighted my cow and card with a black and white pen. To finish I stamped the sentiment and added a bow. I hope you all like my brown cow! :)

Monday, April 11, 2011

CTO Challenge #9


Hello everyone and welcome to another Celebrate The Occasion challenge! This weeks challenge is Easter or Spring and you must use a punch. For my DT card I did a flap card. I started with a 4 X 11 sheet of cardstock scored at 4 3/4 and 9 1/2. I used my scallop border punch and punched along the flap. The scallop oval and oval were cut from Accent Essentials and George custom shaped in my Gypsy. The duck was cut from Simply Charmed at 2 inches and I welded the feet which were from the duck in Create A Critter to the bottom of the egg. I stamped the face with a Peachy Keen stamp and also stamped the sentiment on the inside. To keep the flap closed I used a velcro dot on the bottom of the scallop and pop dotted the top to the flap. I hope you all like my project and I can't wait to see what you'll create! Have a great day!

Saturday, March 26, 2011

Giddy Up


Happy Saturday everone! Here is another layout that I did for my niece's scrapbook. I have to admit that I haven't scrapbooked in so long that I stood and stared at a layout trying to figure out what to do for an hour! So I put that one away and did this one. I am very happy with how this one turned out. I think it will just take some time to get back in the swing of it. I cut the horse, cowgirl, and lasso from Paper Doll Dress Up. I stamped the faces with Peachy Keen stamps and used my black and white pens on them to highlight. The frame was cut from Accent essentials and the title was cut from Robots. I hope you all are having a great day and thanks for looking!

Thursday, March 17, 2011

I'M SO LUCKY BLOG HOP


Hello everyone and welcome to the I'M SO LUCKY BLOG HOP hosted by Jen of Honeybean Creations! Today we are showcasing the way our lives our BLESSED. If you're coming from Paula then you're in the right place. If not you will want to start at the beginning HERE so you won't miss a thing.
I have 2 projects to share with you today! For the first project I did a scrapbook page of me and my hubby on our wedding day. I truly am so BLESSED to have someone whom I love and loves me! We might have our up's and down's but ALWAYS love eachother. I am so happy to have him in my life. I can't imagine life without him.
I punched a 12X12 piece of paper with the border punch and mounted it to a piece of 12X12 black paper. I cut the frames and an extra smaller one to use as a template for the photos. I cut the church at 7 inches and used my white gel pen to highlight it. The bride and groom were cut at 5 inches and I embossed the right side of her dress as well and the veil and bouquet.
Recipe for layout
Font- Gypsy Font
Frames- Once Upon A Princess Cricut Cart
Church, Bride & Groom, "LOVE"- Sweethearts Cricut Cart
Embossing folders- Sizzix Twizzle for brides dress, Swiss Dots for veil and bouquet
Martha Stewart border punch- sorry I don't know the name.


For my second project I made this card for my SIL. Not only is she my SIL she is my BEST FRIEND. To have someone that you can always count on no matter what is a real BLESSING to me.
For my card I made a recessed window card. I love this kind of card and they are very simple to make. You can find the tutorial HERE. I printed the word art off my computer and you can find the free file HERE. I cut the word art out to the size of the window and glued it in. I custom sized the frame in my Gypsy and embossed it. To finish I placed several clovers cut at 2 inches and 1 inch in the corner and tied a ribbon to the top.
Recipe for card
Frame- Accent Essential
Clovers- Paper Doll Dress Up
Embossing folder- Swiss Dots
Your next stop is Jen but before you go I have some BLOG CANDY! I have a $10 gift card to Michaels. Just leave a comment and a way for me to reach you. I would love it if you decided to follow me but is not required to win. I will pick a winner on March 25th. And don't forget to leave a comment on all the blogs in the hop and create a project showcasing your BLESSINGS to qualify for the grand prize being given away at Honeybean Creations! Have a BLESSED day and make sure to come back on Saturday for the SPRING BLING BLOG HOP and for a chance to win more BLOG CANDY!
Here is the blog list in case you get lost:
GiGi- YOU ARE HERE

Tuesday, November 9, 2010

Santa Holiday Card


Hi everyone! Here is the second card to my holiday set so far. I used the same concept as the penguin card but changed it a little. I cut the santa from Simply Charmed at 2 inches. The frame was cut from Accent Essentials at 3 inches. I used my Martha Stewart Drippy Goo border punch for the icicle border and instead of putting ribbon on this one, I put buttons on it. I am going to enter this into the Imagine Nation Monday challenge at My Creative Time which was to use buttons. Have a great day!!!!

Sunday, November 7, 2010

Penguin Holiday Card


Good morning all! Isn't this card just adorable?! I decided to get a head start on making my Christmas cards and this was the first one I made. When I was at Michaels the other day they had all their Monogram cards on clearance for 30 cents for each pack of 8 cards and envelopes so I picked up a couple of packs and decided to use them for my Christmas cards. I used Simply Charmed for the penguin cut at 2 inches and Accent Essentials for the scalloped frame cut at 3 inches with the inner mat cut at 2.75 inches. The scallop border is also from Accent Essentials that I used my hide contour feature on and hid the circles that were in the center of each scallop. The sentiment is a $1 stamp from Michaels and so is the ribbon. I like how the non-traditional colors turned out. I hope you all are having a great day even though it is Monday! :)


Thursday, November 4, 2010

Simple Snowflake Card


Good morning everyone! Here is a quick card I did for Cricut Cardz Challenge Blog. The challenge this week was to make a card for Christmas using the letter S...snowflake, santa, sleigh, etc. I cut my card from Smiley Cards at 5 inches and the frame from Accent Essentials at 4.25 inches. For the snowflake I cut both the regular cut and the shadow for each layer. I also pop dotted the small layer and also to the card to give it lots of height. I accented it by putting a brad in the center and some jewels on the corners. I hope everyone has a wonderful weekend! Take care!


Sunday, October 24, 2010

Blessings Card


Happy Sunday everyone! I made todays card with a couple of challenges in mind. I used the sketch from Cardibilities and the fall theme from Getting Cricky and Fantabulous Cricut. I cut the frames from Accent Essentials at 3 inches. I printed off the sentiment on my computer and then used the center point function on my Expression to do the back layer. The leaves and acorn are cut from Doodlecharms at 1.5 inches. I chalked around the edges and embossed the top of the acorn with the Swiss Dots Cuttlebug folder. I pop dotted the leaves and acorn and I turned up the brown edges of the frame to give it a more layered look. Here are the challenges I'm entering this card into:
1. Cardabilities- sketch
2. Fantabulous Cricut- Falling leaves
3. Getting Cricky- Fall themed