Showing posts with label Hello Kitty Greetings. Show all posts

Friday, April 26, 2013

Day 5 Of My Craft Spot's Release Week


Hello everyone! It's the last day of sneak peeks for My Craft Spot's new releases! Tomorrow we will be having a BLOG HOP with the full release of the stamp and die sets! There will also be a new stamp/metal die set set up for grabs at every stop in the hop.

Today we are showing sneak peeks of the new Feel Better Soon stamp set.
So for my last sneak peek project, I have a fun get well kit. I was inspired to make this when I found those super adorable Hello Kitty Band-Aid's! LOL!
I created the hinged box by cutting 2 simple boxes. Once they were all together, I cut a strip of paper the lenght of the box and 2 inches wide. Then I scored it down the center and attached the two boxes to it. Super simple way to make a hinged box. 
For the front of the box I cut a 1 3/4 inch circle and quartered it for the corners and added simple strips to the sides and for the handle. I also cut a 1 1/2 inch wide strip for the closure and added some velcro to it.  I cut Hello Kitty from Hello Kitty Greetings and welded the nurses hat from Everyday Paper Dolls in my Gypsy. I stamped the RX in the center of the heart with the new Feel Better Soon stamp set and also the tag which I heat embossed. I attached it with some Black Trendy Twine.
The inside I added all the get well items by tying Cherries Jubilee Trendy Twine around each piece and glued them onto the backs of the box. 

Thanks so much for visiting all week long for the sneak peeks! I hope you enjoyed all the projects I shared this week and have inspired you! Make sure you go to My Craft Spot for the daily prize and come back tomorrow for the BLOG HOP! There will be lots of great projects and a stamp/die set will be given away at each blog in the hop! Have a great day!

Tuesday, April 24, 2012

Hello Kitty Car Card


Hello everyone! I have a fun card to show you today that I did for a couple of challenges! I have a trick to share too!
I cut the car card shape from Hello Kitty Greetings and all the front layers. I cut 2 layers of the car front, wheels, light, Hello Kitty's arm, and bumper and pop dotted it to the original layers to get lots of dimension. I hand cut the sentiment banner and stamped the sentiment from My Pink Stamper's Boy Crazy stamp set.
My trick I want to share today is how the sentiment banner folds up! I love making cards like this but they're not very friendly when you try to put them into an envelope. Or you have to make custom envies for them. I made mine so it will fold up and fit into an A2 sized envelope.
I did this by mounting the sentiment banner to a brad that is sandwiched in between the layers. With the pop dots, it will move freely. So before I adhered the front car to the card base, I punched a hole under the back layer of the car and secured the banner to the car with a brad. Then I glued down the front to the card base, but not gluing around that side of the car or brad. This way it will move freely and you can fold it up!
I am going to enter this card into the following challenges:
1. My Craft Spot- Things That Go- Cars, planes, boats, etc.
2. Fantabulous Cricut- On The Go!- cars, planes, bikes, etc.
3. Little Scrap Pieces- Pink and or Purple
Thank for stopping in and taking a look! I hope you all understood my trick that I shared today. Have a great day!

Monday, March 12, 2012

Peachy Purse Bag


Hello everyone! Here is a super cute and fun bag that I made for Peachy Keen's Anything Goes challenge this week. I am always in need of small gift bags, so this will be perfect for my stash. Can you tell that I am DYING for summer by the colors I am using? LOL!
I started by cutting the bag from Tags, Bags, Boxes, and More at 12 inches on my 12 X 24 mat. I cut it with my Gypsy so that's how I was able to get it so big. I have to admit that this is my very FIRST time using the 12 X 24 inch mat. I love how big this bag turned out and might be using the big mat a lot more!
I then cut the front layers by using pattern paper and the negative from the first bag cut as a template where to place my pattern paper. After that was cut, I hand trimmed all the pieces 1/4 inch smaller and glued them onto the bag. I cut the cherries from Hello Kitty Greeting's and stamped the faces with Peachy Keen's Cornie's Faces. The tag was cut from Winter Frolic and I attached it to the bag with some decorative fiber. To finish I added a strip of lace to the bottom of the bag, added a ribbon handle, and added a layered flower to the center flap with a brad. I also added a velcro dot to the flap to close the bag and the sentiment was stamped from Whimsical Designs Whimsical Fun Vol. 1.
I just love how this bag turned out! Thanks for looking and have a great night!

Monday, January 16, 2012

Hello Kitty Treat Cover


Hello everyone! Here is a super simple and quick treat box cover that I did. I cut a 3.75 X 5.75 piece of cardstock and because it was to hard to figure out where exactly to score, I just used the box and folded the edges up. I then cut slightly smaller pieces of decorative paper and glued them to the front, spine, and back, adding a ribbon underneath for the closure. I cut Hello Kitty from Hello Kitty Greetings at 2.5 inches and added Glossy Accents to the nose and eyes. I stamped the sentiment which is from Whimsical Designs Whimsical Fun Vol. 1:

I am going to enter this into Scrappy Moms Terrific Tuesday challenge which is to use cartoon characters.
Have a great day and thanks for looking!

Friday, November 11, 2011

Hot Chocolate Mug Card


Hello everyone! Here is a project that I made for when little one's come to my house during the Holidays! It might only be hot chocolate and a chocolate stir stick, but when it's packaged like this they seem to think it's so much more! LOL!
I made one of these last year if you would like to see that post and where to go for the template, click HERE. I actually made mine using my Gypsy, the mug from Gypsy Wanderings, and some images from George and Basic Shapes.
Hello Kitty was cut from Hello Kitty Greetings at 3.5 inches. The "Merry Christmas" pull tab I made by welding 2 together and folding in half, also cut from HKG. I embossed the front of the card with the Cuttlebug Snowflakes folder and added a ribbon. To finish I added the packet of hot chocolate and a chocolate stir stick.
I am going to enter this into the following challenges
1. My Creative Time Throwback Thursday- Create a project that is KID themed
2. Scrappy Moms Terrific Tuesday- 3D project
3. Getting Cricky Simple Sunday Challenge- Tea time, create a project with a hot beverage theme.

Friday, October 21, 2011

Halloween Hello Kitty Style


IF YOU ARE LOOKING FOR THE WHIMSICAL WEDNESDAYS POST, PLEASE SEE POST BELOW!
Happy Friday everyone! I made this super cute bag to enter into a couple of challenges. I LOVE Hello Kitty and this bag. It turned out so cute.
I cut the bag from Plantin School book and used my Gypsy to cut out the circle in the center front. I also sized and cut the web for the front from Mini Monsters. I glued the web to the back side of the front in the open circle. I  cut a slightly smaller circle for the back inside of the bag. I cut Hello Kitty from Hello Kitty Greetings and added Stickles to her bow and sucker. I did a white stitching line around the bag, tied a crinkle ribbon bow, and added 3D spider stickers that were from Recollections set.
I am going to enter this into the following challenges:
1. Bitten By The Bug 2: Hello Kitty Halloween Challenge
2. More Than Favors Wacky Wednesday: Halloween
3. Crafty Sprouts: Candy Goes Here

Wednesday, August 10, 2011

Back To School With Hello Kitty


Hello everyone! It's time for a new challenge at Whimsical Wednesday's! This time the challenge is Back To School...NO cards.  Our talented designer Faith came up with this fantastic challenge.
First I have to say that I had SO much fun making this cute little set! This backpack was actually very easy to make. I cut the backpack from Camping Critters at 10 1/2 inches. I didn't want the sleeping bag roll so I simply omitted those cuts. I used my sewing machine and did a stitching line down the straps and around the flaps on the pockets. I cut Hello Kitty at 2 inches from Hello Kitty Greetings. After it was all assembled I decided I wanted a stitching line around the flap too so I did that with a white gel pen. This backpack holds a box of crayons perfectly!
For the pen box I used a pattern that can be found HERE. I originally wanted to make a pencil box but this pattern wasn't tall enough to hold pencils. I estimated approximately where I would need a window cut out for my box and cut the rectangle using George and Basic Shapes. I then lined up my pattern over the cut out for perfect alignment and cut out the box. I added a piece of acetate to the window and assembled the box. I modified the closure flap a little and added a border punched strip to it and the background of the decorative strip. I cut Hello Kitty again but this time at 1.5 inches.
I hope you all enjoyed seeing my projects and will play along this week! I can't wait to see what you will create! And don't forget to check out what the other fabulous designers have created this week!Have a great day!

Friday, April 1, 2011

Whimsical Wednesday Blog Hop

Hello everyone and welcome the Whimsical Wednesday Blog Hop! If you are coming here from Cindy, then your in the right place! If not you will want to start at the beginning here! For my first project I made this refrigerator notepad holder. I cut a 5.5 X 11 inch piece of cardboard from a cereal box and covered it with pattern paper. I made a pocket for the notepad cut at 3.75 X 4.5 inches. I thought about gluing a notepad to it but then you wouldn't be able to replace it. This way you can replace the notepad when it's out of paper.For the picture I cut the frog from Paisley at 2 inches and the font was cut from Robots at .75 inches. I then took some old magnets (the ones you get in the mail with credit cards and such) and cut one in half and glued them to the back. This is a picture of it hanging on my fridge!

For my second project I made this card. I LOVE Hello Kitty....she's so cute! :) I just love scene cards and was very happy with how this one turned out. I cut HK from Hello Kitty Greetings at 3 inches and the sun at 1.5 inches. I chose not to do the black layers for the sun. The clouds were cut from Simply Charmed and the grass was cut from Paper Doll Dress Up both custom sized in my Gypsy. The mouse was cut at 1.5 inches from Four Legged Friends and I added a flower to his hands.


I hope you enjoyed my projects and now you're off to Roberta!

And don't forget to leave a comment on everyone's blog to be entered for the awesome blog candy sponsored by Kraft Outlet and Prairie Bird Boutique at Whimsical Wednesday! And also today through April 7th at Kraft Outlet you can get 10% off by using the code BLOGHOP at checkout.

Monday, March 14, 2011

Hello Kitty Purse


Hi everyone! Sorry I didn't get any posts up this weekend. I was up north at my SIL's cabin and have also been working on things for upcoming events. My son's friend's birthday is on Friday and so I made this cute little Hello Kitty purse to put a gift into. I cut the purse from Once Upon A Princess at fit to page. I also cut the purse handles in black and used Glossy Accents on them. Hello Kitty was cut from Hello Kitty Greetings at 3 inches. I glittered her flower in her hair and stamped the sentiment. To finish I added a bow. I am going to enter this into Paper Playtimes challenge this week which is a choice of 3 challenges. 1. Purple and green 2. Pink and glitter (this is the one I did) or 3. Use a critter and a rhyme. I hope you all are having a great day and come back tomorrow for my DT post for Celebrate The Challenge.

Saturday, January 8, 2011

Flaunt It Fridays #6


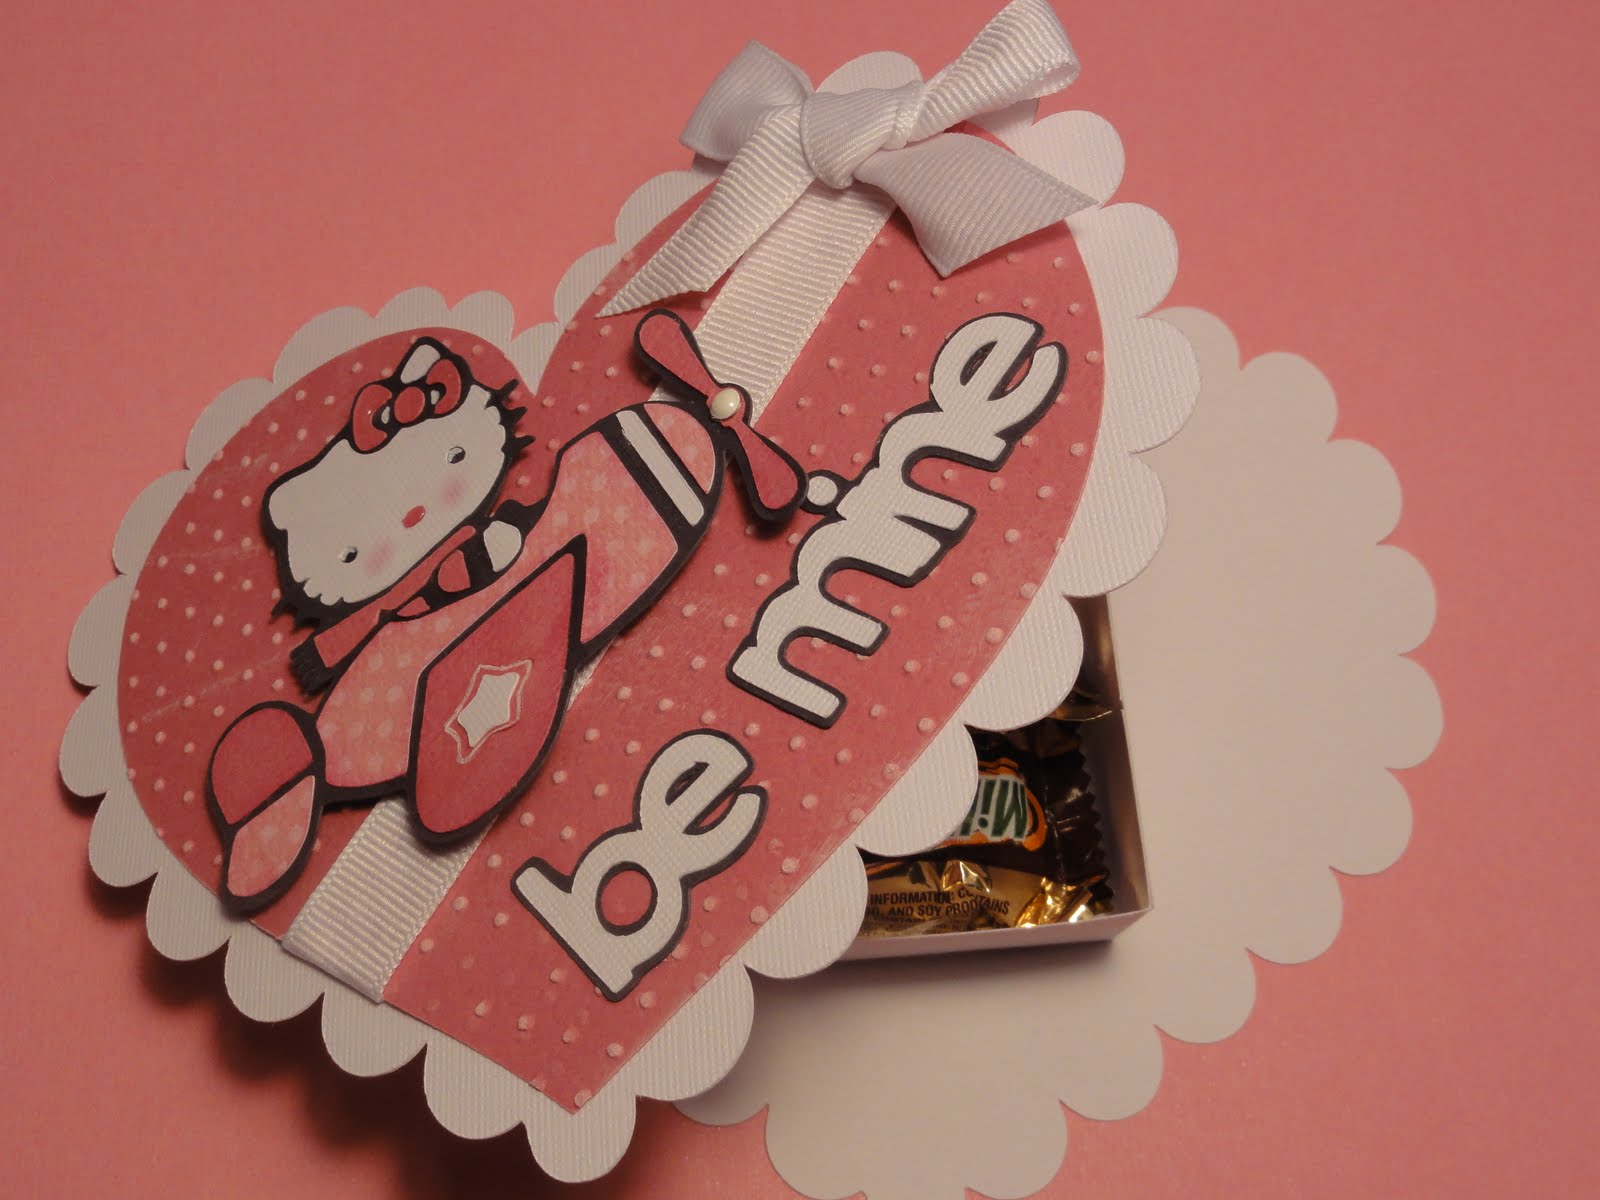
Hi all! I think I am in the Valentine and Hello Kitty mood! :) I made this Valentine box for Flaunt It Fridays challenge this week which was the Hello Kitty in her plane. I made the box by cutting 2 scallop hearts from Twinlke Toes at 5 inches. I made a top and bottom box piece from a 4 in. square and 4 and 1/8 inch square and glued them to the top and bottom scallop hearts. I found a tutorial for the box here. I cut the pink heart out of Twinkle Toes at 4.75 inches and ran it through my Cuttlebug using the swiss dots folder and inked white over the dots. HK was cut from HK Greetings at 2.75 inches and I added a white jem to the plane propeller using my I-rock and glossy accents for her nose and hair bow. The "be mine" was cut from Simply Charmed at 1.61 inches as well and the shadow. To finish I tied a ribbon at angle across the box.
I hope you all are having a great weekend!


Thursday, January 6, 2011

Valentine Notebook


Here is the video showing it "wobble"

Hi everyone! I have 2 "firsts" for me today. 1st is that I got a Bind It All and this is my first project with it and the 2nd is somehow (LOL!) I uploaded a video! YAY! LOL! I made this notebook with my BIA. I started with 2 chipboard pieces from one of the $1 books from Michaels. It had a scallop top with the binder ring in it and I cut that end off to make it straight. I decorated it with this Hello Kitty from Hello Kitty Greetings cut at 2.5 inches. I mounted it to an Action Wobble to get the full effect of the stamped sentiment. I am entering this into My Creative Times Throwback Thursday challenge which was to use an older cart and a heart. I hope you all like my 2 "firsts" and have a wonderful day!!!
P.S. Sorry the video is a little blurry.....I have no idea why! :)