Showing posts with label Winter Frolic. Show all posts

Monday, January 7, 2013

Free Snowmen


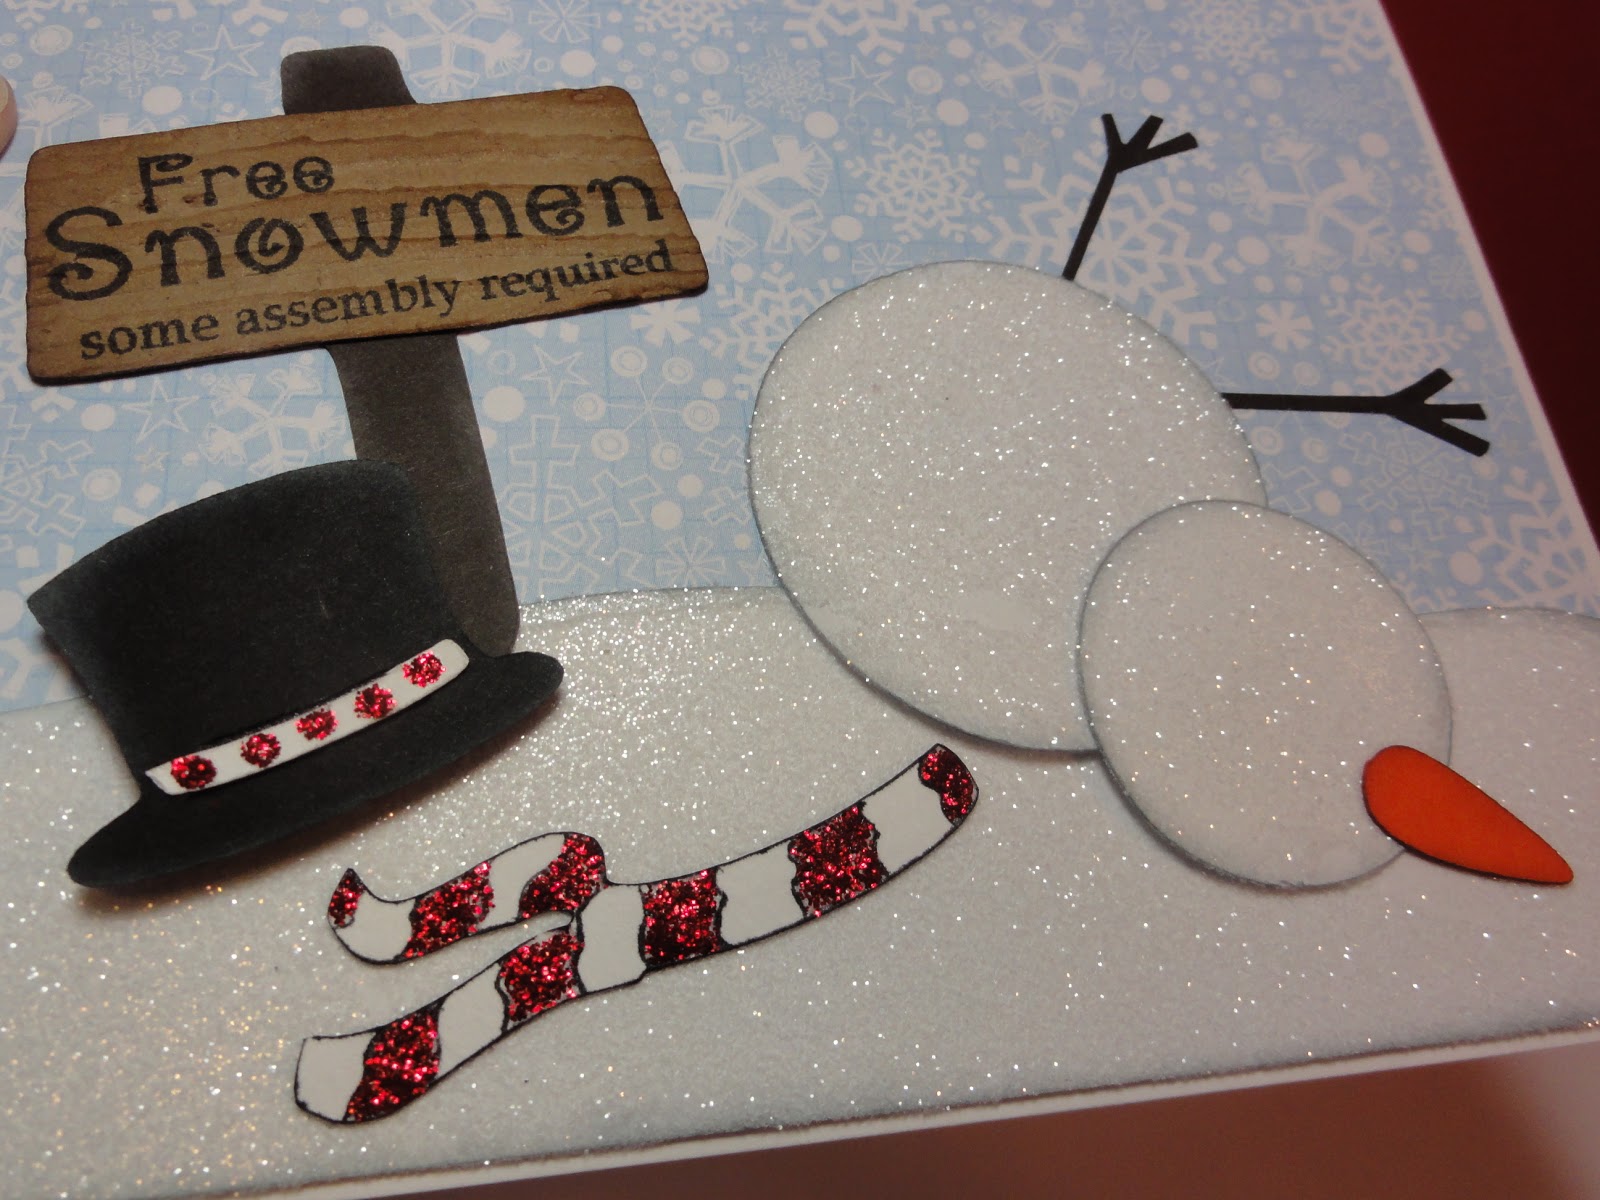
Hello everyone! We're getting back to normal after the holidays with a new challenge at My Craft Spot! This week the challenge is "Frosty Days" Winter themed projects. 
I was inspired to make this card from the sentiment. It's such a fun sentiment and couldn't wait to do something with it. 
I used quite a few different Cricut carts in this card...thank goodness for my Gypsy!
The circles for the snowman were cut  from George and I hand cut the arms. The carrot and scarf were cut from Winter Frolic and I hand drew in the lines for the scarf and added stickles. The hat was cut from CAC2 and the sign from Freshly Picked. I stamped the sentiment from My Craft Spots Think Snow stamp set and then embossed it with the Tim Holtz Woodgrain folder. To add some shimmer to this card, I added glitter to the snowman and snow layer at the bottom. 
I hope you all will play along this week and please don't forget to check out what the rest of the DT has created! Have a great day!
SUPPLIES
My Craft Spot- Think Snow stamp set
Cricut- Create A Critter 2, Winter Frolic, Freshly Picked, and George and Basic Shapes
Tim Holtz Woodgrain embossing folder
Stickles and glitter

Saturday, December 22, 2012

MERRY CHRISTMAS EVERYONE!


Hello everyone! Christmas is only a couple of days away now and sometimes we forget the true meaning of Christmas. I know I do. We get caught up shopping for that perfect gift, making the best meals, etc. So I wanted to share this card, a reminder to me what it's truly about.
First off I have to tell you that this card is SO much prettier in person. I tried and tried to get a really good picture, but it just wouldn't come out any better than this. 
The manger scene was cut from Winter Frolic and I used lots of embellishments on it. I stamped the face with a Peachy Keen face, added chunky glitter to the star, and a added shredded raffia for the hay in the bed. The shadow layer and the card base were cut from metallic gold paper. I inked the edges of the cream background and added a metallic gold strip at the bottom with a raffia bow. To finish, I stamped the sentiment from My Craft Spot's Bundle Of Joy stamp set. What a perfect sentiment for this card, wouldn't you agree?
I want to wish you all a MERRY CHRISTMAS and HAPPY NEW YEAR! Thank you so much for stopping in today and for all your bloggy love through out this year! HUGS!
SUPPLIES
My Craft Spot- Bundle Of Joy stamp set
Cricut- Winter Frolic
Raffia and MS Chunky Glitter

Monday, December 17, 2012

JOY Shape Card


Hello everyone! It's time for a new challenge at My Craft Spot! This week the challenge is "Christmas Shape Cards".
I made this fun card in CCR. I welded the J and Y to the snowman shadow to create the base of my card. The J and Y are from Cricut Craft Room Basics and the snowman from Winter Frolic. I stamped the snowman's face with a Peachy Keen face and added LOTS of glitter to him. I also stamped the sentiment to the bottom of the snowman from My Craft Spot's Think Snow stamp set. After the base was complete, I folded a piece of white card stock in half and glued my image down. Then I used my scissors and trimmed around the card to give it it's shape. 
I hope you all will play along this week and please don't forget to check out what the rest of the DT has created! Have a great day!
SUPPLIES
My Craft Spot- Think Snow stamp set
Cricut- Winter Frolic and Cricut Craft Room Basics

Thursday, July 12, 2012

Day 4 Of My Craft Spots Release Party


Hello everyone! Day 4 of My Craft Spot's sneak peeks, and only 2 days until the full release and BLOG HOP!!! Are you getting excited yet? Make sure you go over to My Craft Spot everyday this week for a daily prize. And come back on Saturday for the Blog Hop where you could win a new stamp from each blog in the hop!
Today we are giving Sneak Peeks of the Bundle Of Joy stamp set. I have to admit that I actually cried when I read some of these sentiments! My only child is getting ready to head off to college and these stamps really touched my heart. Kimberly had created some beautiful stamps in this release!
For my card I created this beautiful scene. And the sentiment is SO true! There's nothing like holding your baby for the first time and realizing that you LOVE them more than anything else.
I cut the "mom" from Sweethearts. She's the girl being proposed too. I sized her really big so just her upper body would show in the frame. The crook of her arm was the perfect place to put a baby. The baby was cut from Winter Frolic (Baby Jesus). I re-sized him a little wider in my Gypsy and stamped the face. I also covered his whole body in twine to make it look like a baby blanket and added his head over the top. The heart mat and scallop frame I cut by hand so I could custom size it to the stamp. I used a pair of scallop scissors to get the scallops. To finish the front I added a punched border strip and some crinkle ribbon with a bow. The inside I stamped the sentiment and added a matching paper strip.

SUPPLIES:
My Craft Spot- Bundle Of Joy Stamp Set, Lemon Divine Twine and Buttercup Crinkle Ribbon
Cricut- Sweethearts and Winter Frolic
Peachy Keen- Happy Lashes ( I used the nose stamped twice, once upside down for the mouth on the baby)
Border Punch, Scallop Decorative Scissors, Sizzix Button Candy Texture Folder
Thanks for stopping in today and don't forget to head over to My Craft Spot for more sneak peeks and the daily prize! Have a great day!

Monday, March 12, 2012

Peachy Purse Bag


Hello everyone! Here is a super cute and fun bag that I made for Peachy Keen's Anything Goes challenge this week. I am always in need of small gift bags, so this will be perfect for my stash. Can you tell that I am DYING for summer by the colors I am using? LOL!
I started by cutting the bag from Tags, Bags, Boxes, and More at 12 inches on my 12 X 24 mat. I cut it with my Gypsy so that's how I was able to get it so big. I have to admit that this is my very FIRST time using the 12 X 24 inch mat. I love how big this bag turned out and might be using the big mat a lot more!
I then cut the front layers by using pattern paper and the negative from the first bag cut as a template where to place my pattern paper. After that was cut, I hand trimmed all the pieces 1/4 inch smaller and glued them onto the bag. I cut the cherries from Hello Kitty Greeting's and stamped the faces with Peachy Keen's Cornie's Faces. The tag was cut from Winter Frolic and I attached it to the bag with some decorative fiber. To finish I added a strip of lace to the bottom of the bag, added a ribbon handle, and added a layered flower to the center flap with a brad. I also added a velcro dot to the flap to close the bag and the sentiment was stamped from Whimsical Designs Whimsical Fun Vol. 1.
I just love how this bag turned out! Thanks for looking and have a great night!

Monday, December 26, 2011

Snow Angel


Hello everyone! I hope you all had a wonderful Christmas! Now that Christmas is over I can get back to my blog!
I made this card to enter into Peachy Keens Designers Choice challenge. I cut the girl from Winter Frolic at 3.5 inches and stamped her face with a Peachy Keen Everyday Character face stamp. The circle sentiment is a combination of the snowflake stamp and sentiment stamp from Whimsical Designs Snow Much Fun stamp set. I mounted the sentiment to my acrylic block rounded and stamped it on the top and bottom. Then I stamped the snowflake in the center. I punched out the circle with a punch and mounted it to a Nestabilities Lacey Cricle die. To finish I mounted the circle on a pop dot and added a bow.
I hope you all liked my card and thanks for looking! Have a great day!

Tuesday, December 20, 2011

Enjoy The Magic Of The Moment


Hello everyone! Can you believe Christmas is only 5 days away! In celebration of Christmas, I made this tag. Sometimes I forget the true meaning of Christmas, and to me this tag a wonderful reminder. The birth of Jesus.
I cut the tag and mat from Tags, Bags, Boxes, and More at 4 inches. The baby and star were cut from Winter Frolic. I embossed the manger with a Mesh Texture folder and inked all the edges of the cuts. I used a black pen to draw in the eyes and nose. I added chalk to the cheeks and I pop dotted the head. The star front I covered with chunky glitter and pop dotted it to the star base. The sentiment is from Whimsical Designs Whimsical Fun Vol. 1. I thought this was the PERFECT sentiment! Enjoy the magic of the moment... of Christmas. I stamped the sentiment, tore the paper, and inked the edges. To finish I added a crinkle ribbon hanger and bow.
I hope you all have a WONDERFUL day and thanks for visiting.
I am going to enter this into the following challenges:
1. My Craft Spots Monday Challenge- Tag...You're It
2. Fantabulous Cricut- Trimming with a tag
3. Whimsical Designs- Tags
EDIT: People have been asking about the paper I used. It's from DCWV Christmas Combo stack that I bought last year.

Friday, December 16, 2011

Reindeer Crossing


Happy Friday everyone! Here is a fun card that I made for a couple of challenges.
I made the card base by welding 2 tags together from Winter Frolic and cut the co-ordinating mats. I inked around all the edges and used a black pen for the dash line on the red and a gold pen for the dotted line on the white. The reindeer were cut from Christmas Cheer and I inked them and used a black pen to highlight their faces, their hooves, and noses. Thats ALOT easier than trying to cut and glue such little pieces. The tree were cut from a border in Winter Frolic and I added clear glitter glue to them. The sentiment is from Whimsical Designs Snow Much Fun stamp set. I stamped it in red and embossed it with clear. The holly leaves were from a punch that I inked and added the clear glitter glue to them also. I am going to enter this into the following challenges:
1. My Craft Spots Monday challenge- Make a shape card
2. More Than Favors Wacky Wednesday- Christmas
3. BBTB2- Winter Frolic Tag

Monday, October 24, 2011

LFIF Windy Challenge


Hello everyone! Here is a fun card that I made to enter into Peachy Keen's LFIF Windy challenge. When I think of skiing, I think of the wind in my face. That is what I used for my inspiration for my card.
I cut the skiing bunny from Winter Frolic and stamped the face with a PK face stamp. The snow hill I cut by hand and stamped the sentiment. I also did some inking around all of the cuts and added a faux stitched line around the card. I punched some snowflakes and circles for the snow and added Stickles to the circle snow pieces.
I hope you all are having a great day and thanks for looking!

Sunday, October 2, 2011

'tis the season


Hello everyone! Here is the card that I made to enter into My Pink Stampers Christmas Challenge.
I cut the mouse from Live Simply and chalked around the edges. The ornament he's holding is from a piece of decorative paper that I cut out. The tree is from Winter Frolic and I punched circles out for the ornaments and inked around the edges. The star on top is 2 different sized star punches that I layered together. To finish I stamped the sentiment, added some twine and a punched border strip. I hope you all are having a great day and thanks for looking!

Saturday, July 23, 2011

Nuttin's Better Than Christmas!


Hello everyone! Here is the card that I made to enter into My Craft Spots Monday challenge. This week the challenge is Christmas in July.
I cut the beaver from Winter Frolic and stamped his face with a Peachy Keen face stamp. I used my white gel pen and added the stripes to the scarf and dots to the hat. I also chalked his tail and cheeks and used a black pen to highlight his body. I stamped the sentiment using a Scrappy Mom's stamp combined with  a Christmas stamp. I used a punch for the snowflake and added white gems using my I-Rock.
I hope you all liked my card and thanks for looking. Have a great day!
P.S. I am going to be out of town at my sister's Bridal Shower, so if any of you are planning on attending My Pink Stamper Live tonight, and by some miracle I make her Design Team, could you leave me a comment? And or let her know where I am if she asks if I am there? I really have my fingers crossed! :) I will be checking on my phone! Thanks so much!

Saturday, January 15, 2011

Fantabulous Cricut #42


Hello everyone! Isn't this card SO CUTE? I love how it turned out! I did this card for Fantabulous Cricuts weekly challenge which was "winter warmies" hats, mittens, etc. I got out my trusty sewing machine that I really neglect lately and sewed around the card. I cut the girl from Jolly Holidays at 3 inches. Then I trimmed some of these fur balls off of a trim ribbon and glued them to her hat and dress. It really came out cute and very furry looking. Then I cut the mitten border from Winter Frolic at 1 inch and accented it with my black pen. To finish it I stamped the sentiment and added brads to the side and made my bow with a matching brad. I am also entering this into My Pink Stampers challenge which is to make something with either her stamps or pink. I hope you all are having a great weekend and don't forget to leave a comment here for a chance to win Winter Frolic. I will be drawing the winner tomorrow.

Sunday, December 12, 2010

HO! HO! HO!


Hi everyone! What a crazy weekend! We got so much snow that I am sick of it already! :) It will be nice for Christmas, but after that it can go away without me complaining! LOL!
Isn't this card SO CUTE!!!! I just got the I-Top tool and couldn't wait to do something with it, so here is my creation. I cut the santa from Winter Frolic at 4 inches and framed him. The frame was cut from George at 2.5 inches, then I glued the frame where I wanted it and cut the rest of santa away around it to get it to look like he's looking through a window. The buttons I made with my I-Top from stamped HO! HO! HO!'s on red cardstock. The paper is from DCWV Christmas Combo stack. I am entering this card in the following challenges:
1. Bitten By The Bug 2- Santa from Winter Frolic
2. Jitterbuggin'- Santa
3. Cooking With The Cricut- No red or green together

Thursday, December 9, 2010

Fantabulous Cricut #39 Santa Gift Basket


Hello everyone! I have been working on my gift baskets and this is another one. For this one I used Doodlecharms for the santa and the reindeer. I used Wrap It Up for the pillow box that has the hot chocolate inside and I made a bag for the tootsie rolls with an acetate window. For the cookie packs I made simple sleeves and just tied a ribbon around the mint stir sticks. I am going to enter this into Fantabulous Cricuts weekly challenge which is to make a gift or gift packaging.


Friday, December 3, 2010

Snowman Ornament Card


Happy Friday everyone! There is a new challenge blog that I am so excited about! It looks like so much fun! It's called Flaunt It Fridays. This card I made to enter into their first challenge which was to use the snowman on page 29 of Winter Frolic. I cut the ornament card from Winter Frolic at 7 inches that I welded together in my Gypsy. The snowman I cut at 2.5 inches and the snowflakes are a punch. I added silver paper to the top of the ornament and used rick rack as trim on the outside as well as the inside. I double pop dotted the snowman and single pop dotted the snowflakes. I hope you all will check out this new challenge blog! I am also going to enter this in Gigi's Creative Designs challenge which was to make a holiday card and use pop dots. Take care and have a great weekend!

Tuesday, November 23, 2010

Snowman Gift Basket


Hello all my friends! This is a gift basket that I have been working on. I wanted to make some that would work for teachers, co-workers, ect. I found these super cute baskets at my local Family Dollar and new I wanted to do something with them. I did another one of those cute hot chocolate pillow boxes from Wrap It Up and did just simple sleeves for the cookies and popcorn. For the mint sticks I just tied a piece of yarn around it. The tag I printed off my computer with the contents of the basket. The card I included with this one is the Cricut free card that I did last week. You can find it here. I have 3 more different colored baskets, so I will post them as I do them. Take care all!
I am going to enter this into My Creative Times Imagine Nation Gift Challenge.


Thursday, November 18, 2010

Mouse Hot Cocoa Holder


Good morning everyone! Isn't this SO CUTE!?! Over at Crafting With Cristina she has a challenge for making hot cocoa gifts. This is what I came up with. I almost did another mug one like on a previous post found here but decided to use my new Wrap It Up cart. I cut the pillow box from Wrap It Up at 8 inches and punched a hole in the upper right corner for my tag. I used my Gypsy to hide the flower cut in the center of the box. The mouse was cut at 2.5 inches from Winter Frolic as was the cup that was cut at 1 inch. The tag is also from Winter Frolic cut at 2.25 and the inner part at 2 inches. The snowflake border and snowflakes on the cups are a punch. I hope you all are having a great day!