Showing posts with label George And Basic Shapes. Show all posts

Monday, August 5, 2013

Hog Wild For You!


Hello everyone! It's time for a new challenge at My Craft Spot! This week the challenge is to create a CAS (Clean And Simple) card. This was a challenge for me personally, because I love to add lots of details to my cards! LOL!

This might look like a simple card, but it was a tough one to create! I started with a 5X5 inch white piece of cardstock. I cut 2 circles using my Cricut and traced them onto the cardstock lightly in pencil. Then I stamped the pig using Peachy Keen's May 2013 SOTM kit but I had to mask off some of the stamp. I wanted is arms to come over, but his body to stay inside the circle. After he was stamped I colored him with Copic markers and traced over the lines of the circle with a black pen. Then I cut out the negative parts around the pig inside the circle and mounted it on pop dots. I stamped the sentiment using My Craft Spot's Down On The Farm stamp set and added a black line around the card. To finish I added some hearts that I cut out using My Craft Spot's Small Alphabet Dies, inked the edges and added black lines around them.

I hope you will all play along in the challenge this week and please don't forget to check out what the rest of the DT has created! Have a wonderful day!

Thursday, August 1, 2013

Peachy Keen Anything Goes Challenge


Hello everyone and Happy Friday! Peachy Keen has a new challenge up and it's an "Anything Goes" challenge. Create whatever your heart desires, just make sure to use your Peachy Keen Stamps!

I made this adorable Box In A Bag for my project today. These are really easy bags to create and you can find a wonderful tutorial HERE on how to make them. I did do mine slightly different and I will tell you all about it.
I decided I wanted to add handles to my bag! So I used my Cricut and cut an oval with another oval layered inside to create my handles. After they were cut out, I traced them onto my bag and trimmed around where the handle would go. I cut a total of 4 handles, one for the front and back for each side of the bag and glued them on. 
I stamped and colored the bird using Peachy Keen's Lil' Tweets Bird-day stamp set. I cut out the mat around the bird in an oval and mounted that to an oval mat. I also stamped the sentiment onto a banner and pop dotted it to the bag.  I added a border around the bottom on the bag and tied the bag closed using a ribbon. 


I hope you all will play along and please don't forget to check out what the rest of the DT has created! Have a great weekend! 


Saturday, June 29, 2013

My Craft Spot Summer Release Blog Hop

Hello everyone! It's FINALLY here! The stamp reveal for My Craft Spot's Summer Release! YAY! And it's time for a super fun blog hop where you could win one of the new stamp or die sets!
If you came from My Craft Spot, you're in the right place. If not you will want to start at the beginning at My Craft Spot so you won't miss a thing! You can also see all the new stamp sets there too!

Here is what I created for this blog hop!


I created this card using the NEW Tiny Tags 3 stamp set and I also used My Craft Spot's Tiny Doilies and Lacy Banner Dies for the bubbles.
I used my Gypsy and George to create the card base and the oval mat. I used a black pen and did a dotted line around the mat.
I cut that adorable turtle from a Pretty Paper Pretty Ribbons file called Sea Life. I added some punched flowers to his shell and used a white pen to do some dots on him. 
The larger bubbles are from My Craft Spot's Tiny Doilies and Lacy Banner Dies and I stamped the sentiments using the new Tiny Tags 3 stamps set. I also added some glitter to the edges of the bubbles and ribbon strip.
To finish I added a green ribbon to the bottom on the card. 

Now for the BEST part! Each one of us is giving away 1 one the new stamp/die sets! All you have to do is leave a comment on all the blogs through the hop, and that will give you a total of 9 chances! 
I am giving away the very set that I used on this card, the Tiny Tags 3 stamp set


Just leave a comment and you will be entered to win. We will announce all the winners on Monday July 1st.

Now you're off to the very talented Ally!
Here is the hop order in case you get lost along the way

Kimberly
GiGi
Ally  
Gwen 
Robin
Kate
Heather
Sherrie 
Marlene


Thanks for hopping with us and have a great weekend!

Monday, February 11, 2013

Love U!


Hello everyone! It's time for a new challenge at My Craft Spot. This week the challenge is "For Your Sweetheart" Create a Valentine for your sweetheart.
I made this card. I went out of my normal realm and created this shabby chic Valentine's card. I hope you all like it!
I started with the paper really...I used My Minds Eye Love Me 6X6 stack as my inspiration for this card. I cut out the banner from one of the sheets of paper and added a gray strip that I cut out using a pair of decorative scissors. I cut out the heart on my Cricut and also used my decorative scissors to cut the mat around it. I used a chipboard key that I got in a bag of pieces for $1 at Michaels and colored it with a metallic marker. After I colored it I used clear embossing powder on it and heat embossed it. I tied some Ivory Just String through a metal locket charm and attached it to the key. I used My Craft Spot's Tiny Tags dies and Tiny Tags 2 to create the tag and attached it to the card with more Ivory Jute String. To finish the card, I also stamped the inside with MCS's Always And Forever stamp set and added some decorative paper.
I hope you all will play along and please don't forget to check out what the rest of the DT has created! Have a great day!
SUPPLIES
Cricut- George And Basic Shapes
My Minds Eye Love Me paper stack

Saturday, February 9, 2013

You're Purr-fect!


Hello everyone! I have one of my last Valentine card to share with you today! I love My Craft Spot's Valentine's stamps. They are so fun and versatile. Did you know that most of the sentiments are broken up so you can create any kind of sentiment phrase you want. For example, the sentiments I used on this card could easily be used for a Thank you card or any other kind of kitty card because the "Valentine" is not connected!
Here is the set that I used on this card:

I cut the kitty from Create A Critter 2 and did not add her tiara. I also added some brown spots with scrap paper that I cut by hand and stamped the face with Peachy Keen's Here Kitty Kitty faces stamps. AND, did you notice....I gave her a tail! I don't know why these cuts never include a tail! I did this in my Gypsy by welding a J from George and Basic Shapes to her. I also gave her a collar and used my I-ROCK to apply some gems to it.
The rosette is cut from Ribbons and Rosettes and I added a pink gem to the center. To finish, I stamped the sentiment from My Craft Spot's Build A Valentine stamp set.
I hope you all liked my card and thanks for stopping in. Have a wonderful day!

SUPPLIES
My Craft Spot- Build  A Valentine stamp set
Peachy Keen- Here Kitty Kitty Face Assortment
Cricut- George and Basic Shapes, Create A Critter 2, and Ribbons and Rosettes
I-ROCK and gems


Wednesday, January 23, 2013

Up A Tree


HOW CUTE ARE THESE BEARS?


Hello everyone! I wanted to share this adorable card that I made using Peachy Keen's NEW Teddy Bear Faces and the January 2013 SOTM kit. I just LOVE how this card turned out and my SIL is going to freak out when I give this to her! She has a thing for bears. LOL!
To create the tree background this is what I did:
 I started with a 4 1/4 X 8 1/2 inch piece of Kraft cardstock.  I marked out where I wanted the holes for my bears to be and using the CENTERPOINT feature on my Cricut, I cut out 1 3/4 inch circles. After the holes were cut I embossed the piece with the Tim Holtz Woodgrain folder. You will have to do it on each end and it will not match up exactly. So what I did was I took my stylus and my mouse pad and embossed so that the lines would match up. After it was embossed, I inked over all the raised edges with some distress ink. BE CAREFUL with it. The embossing is really deep and it will tear VERY easy! After the tree part is all done is when I trimmed it to fit my card. The reason I did this is because of the embossing, sometimes it shrinks to much.
I stamped the tag, which is from the $1 bin at Micheals, and added it to twine around the card. Then I mounted it to a folded in half 8 1/2 X 8 1/2 inch piece of dark brown cardstock. 
I stamped the bears and colored them with Copic markers and cut them out. I placed them in the holes and pop dotted their paws. 
The tree branches were cut from Create A Critter (from the dinosaur cut). I cut 5 of them and used a Copic marker to highlight them. I arranged them around the top and the top corner one I mounted on pop dots. 

I hope you all liked my card and thanks for looking! Have a great day!
GiGi

Saturday, January 12, 2013

Sweetheart Valentine


Hello everyone and happy Saturday! I don't know about you, but as a paper crafter, I LOVE making Valentine's projects! So this is my first of probably many to come! LOL!

I started this card with stamping the Peachy Keen  XO background and heat embossed it in white. The Cherub is also from Peachy Keen and I colored her with Copics. I added some white pen work to her and some stickles to the cloud. The heart was cut from George and Basic Shapes and I did a white stitching line around it. I stamped the sentiments from My Craft Spot's Always And Forever stamp set and heat embossed these as well. This set is amazing and perfect for creating awesome Valentine's projects! Check it out!

I hope you all have a great weekend and thanks for stopping in!

SUPPLIES
My Craft Spot- Always And Forever stamp set
Cricut- George and Basic Shapes

Monday, January 7, 2013

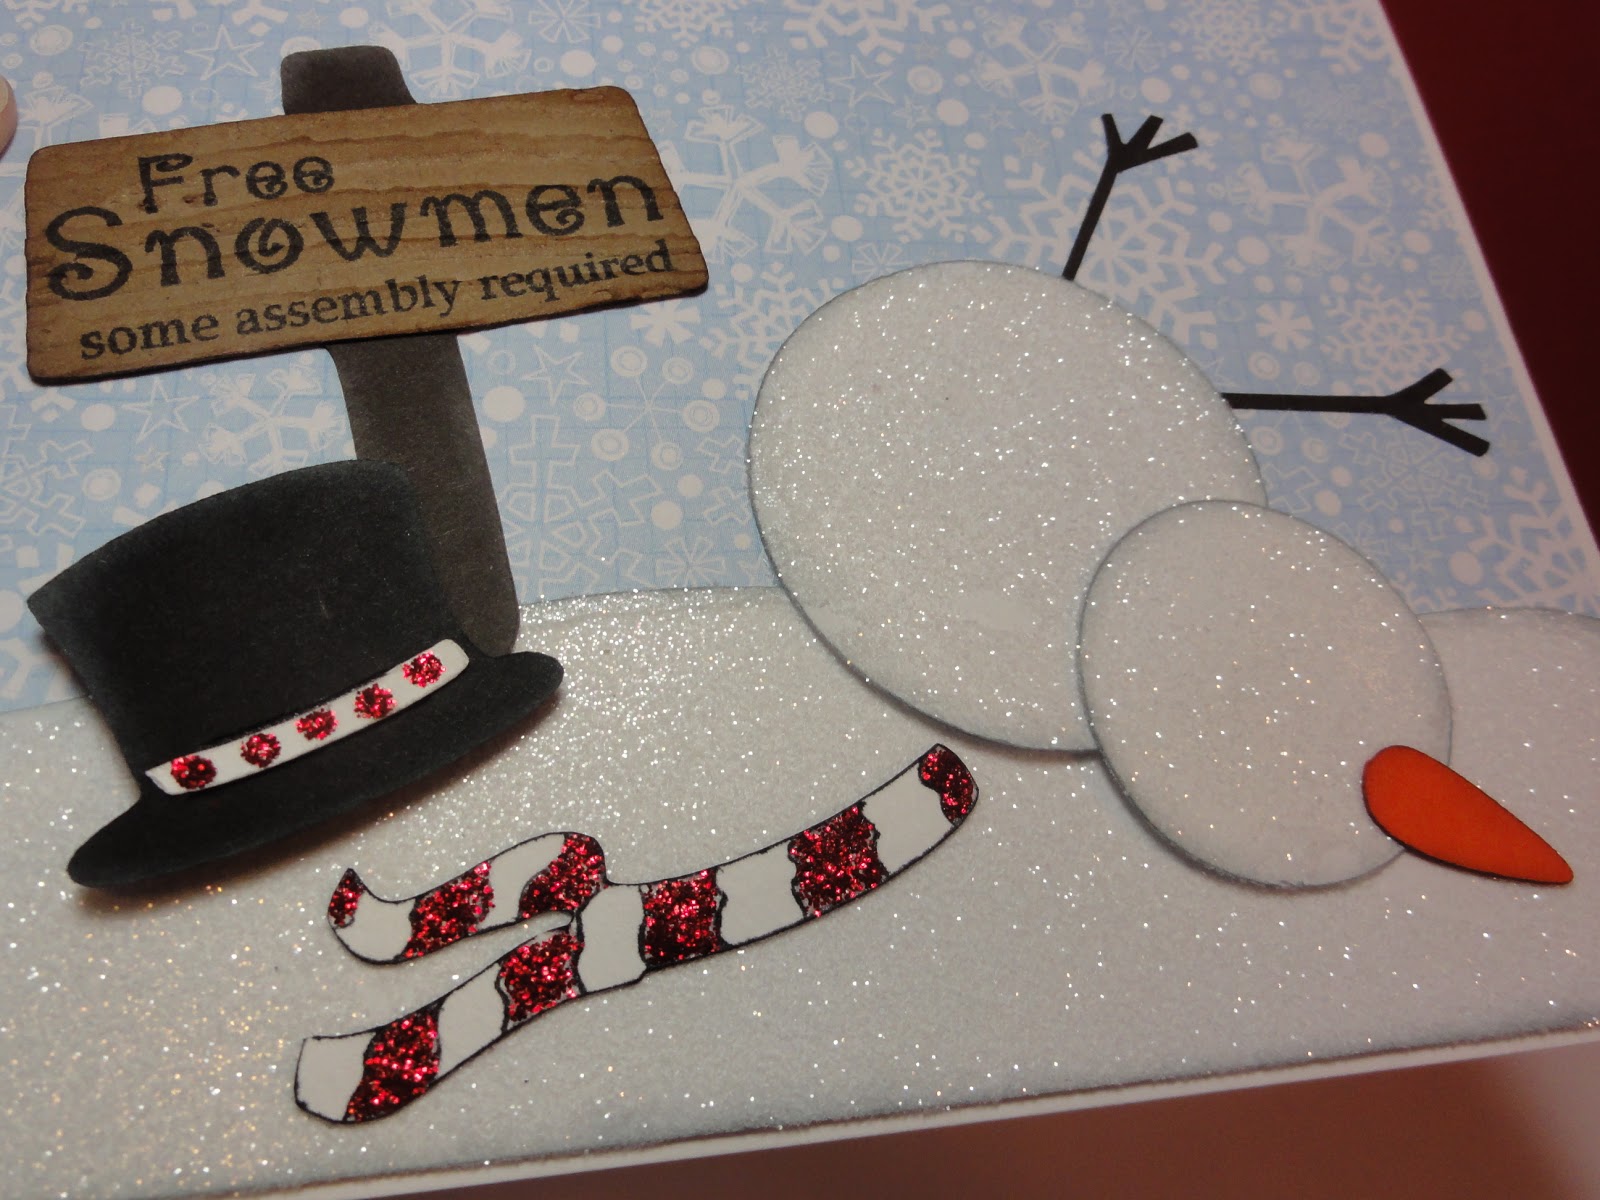
Free Snowmen


Hello everyone! We're getting back to normal after the holidays with a new challenge at My Craft Spot! This week the challenge is "Frosty Days" Winter themed projects. 
I was inspired to make this card from the sentiment. It's such a fun sentiment and couldn't wait to do something with it. 
I used quite a few different Cricut carts in this card...thank goodness for my Gypsy!
The circles for the snowman were cut  from George and I hand cut the arms. The carrot and scarf were cut from Winter Frolic and I hand drew in the lines for the scarf and added stickles. The hat was cut from CAC2 and the sign from Freshly Picked. I stamped the sentiment from My Craft Spots Think Snow stamp set and then embossed it with the Tim Holtz Woodgrain folder. To add some shimmer to this card, I added glitter to the snowman and snow layer at the bottom. 
I hope you all will play along this week and please don't forget to check out what the rest of the DT has created! Have a great day!
SUPPLIES
My Craft Spot- Think Snow stamp set
Cricut- Create A Critter 2, Winter Frolic, Freshly Picked, and George and Basic Shapes
Tim Holtz Woodgrain embossing folder
Stickles and glitter

Sunday, January 6, 2013

I Ain't Lion, I'm A Bear!


Good morning everyone! Last night was the Release Party at The Peachy Keen Connection and they revealed all the new stamps! OMG! They are SO cute! You can see the full release HERE and all the wonderful inspiration from the DT HERE.
This is a card that I literally finished right before the party. After the party was over, I had to run out the door to go watch the Packer game! GO PACK GO!....So that's why this is a little late! LOL!
Before I get to the detail on my card above, I want to share the stamp set that I used. This is Peachy Keens January 2013 SOTM.
Isn't is AMAZING?! I LOVE this fun set!


I created my lion by using the bear head and hair. I stamped and cut out 7 pieces of hair to create the mane and pop dotted the top one. For the face I used PK's Here Kitty Kitty and also used the muzzle stamp from the SOTM set. I colored the face with Copics and used a white gel pen to color in the eyes and muzzle. I mounted him to a matted circle that I cut with my Cricut and stamped the sentiment. To finish I paper pieced the paws and pop dotted them to the card and added a ribbon. 
I hope you all like seeing my card and the new stamps! They have a fun challenge going until January 8th at midnight HERE and the prize is a $50 Peachy Keen gift certificate! The challenge is to create a project using something NEW. Like new paper, pens, stamps, etc.
 I hope you all will come play and have a great day!

Wednesday, December 12, 2012

NO Peeking!


Good morning everyone! I have a super sweet bag to show you today that I used My Craft Spot stamps on. This week at My Craft Spot the challenge is "Wrap It Up" Create gift packaging. You have until Monday to get your project in for a chance to win a stamp set!
I made this bag using THIS tutorial I saw the other day. It it really easy to do and I love how you can re-size it to any size you need. 
My bag is smaller. It measures 5.25 X 5.5 inches. Perfect for those little gifts.
After I created the bag I added some decorative paper and ribbon handles. I also tied bows to the front and added the tag. The teddy was cut from Teddy Bear Parade and the circle mats from George and Basic Shapes. I also cut the ovals for her paws from George. I opted to not use her big reindeer nose that goes with this cut and instead stamped the face with a Peachy Keen face stamp. I added Glossy Accents to her nose and tied some twine for her antlers. For the bottom of the bag I punched an oval, stamped the sentiment, and added it to a banner that I scored and folded back and forth.
I hope you all like my bag and thanks for stopping in! Have a great day!
SUPPLIES
My Craft Spot- Mistletoe stamp set and Cherry Divine Twine
Peachy Keen- PK-110 Here Kitty Kitty Face Assortment
Cricut- Teddy Bear Parade and George and Basic Shapes

Sunday, December 9, 2012

Travel Mug Gift


Hello everyone! I wanted to share the second project I did for the Peachy Keen Release Party challenges. For this challenge you were to add a "drink" to your project.
I bought these cups from the Dollar Store. You can twist the outer layer open and add your own design for the inside. I used the sheet of paper that came with the cup for a template and made my own background. On the snow layer at the bottom, I stamped the sentiment using My Craft Spot's Think Snow stamp set. I cut circles from George and Basic Shapes to create the snowman. I stamped the face with a Peachy Keen stamp and hand cut the scarf. I also created a tag for it by cutting the travel cup from Love You A Latte. I stamped the "to and from" from My Craft Spots Stampin' Around Christmas stamp set. I added a punched snowflake with a brad center and tied it on with some twine. 
I plan on putting a Starbucks gift card inside the cup and give it as a gift. 
I hope you all are having a great weekend and thanks for stopping in! 
SUPPLIES
My Craft Spot- Stampin' Around Christmas and Think Snow stamp sets, Twisted Lime Trendy Twine
Peachy Keen- PK-520 Winter Face Assortment
Cricut- George and Basic Shapes and Love You A Latte

Wednesday, November 7, 2012

Day 3 Of My Craft Spot's Stamp Release Party


Hello everyone and welcome to day 3 of My Craft Spot's Sneak Peeks! Everyday this week there will be lots of fun projects to see and giveaways each day! We will be having a blog hop on Saturday along with the full reveal of all the new stamp sets! We ALL will also be giving away 1 of the new stamp sets at each blog in the hop!
Today we are showing sneak peeks of the new Joy To The World stamp set. 
This card turned out so pretty! I love all the texture and layers. 
I distressed the edges of the background and used my sewing machine to sew around it. I added a rectangle of burlap and layered stars on top. The stars were cut from George and Basic Shapes. I embossed the big one and made the smaller one 3D. I did this by starting in the center and scoring to each point. Then I scored to each inside. Then I folded the lines up and down to make it stand up. I added some crinkle ribbon with a button center tied with some jute string. The sentiment banner was cut from Once Upon A Princess and I stamped that beautiful sentiment. 
Thanks for stopping in today and I'll be back for Day 4 tomorrow. Don't forget to go to My Craft Spot for the daily prize and the other projects from the DT.  Have a great day!
SUPPLIES
My Craft Spot- Joy To The World stamp set, Vanilla Bean Crinkle Ribbon, Brown Jute String
Cricut- George and Basic Shapes, Once Upon A Princess
Textile Cuttlebug Embossing Folder