Wednesday, February 27, 2013

Birthday Monkey


Hello everyone! It's my day to post over at My Craft Spot and I have this fun card to share! I used My Craft Spot's Tiny Doilies Dies and Lacy Banner Dies on this card. 
I cut the monkey from the MP3 Monkey SVG Cutting Files. I hid the eyes and stamped the eyes and nose using Peachy Keen face stamps. I also opted to not use the MP3 player. The hat was created by using MCS's Lacy Banners Die and I added a twine pom to the top. The balloon was made using MCS's Tiny Doilies Dies and I hand cut a piece for the bottom of the balloon. I attached some twine from the balloon to his hand and pop dotted the balloon.
I used my sewing machine and did a black stitched line around the card and stamped the sentiment onto a banner using MCS's Birthday Wishes stamp set.
I hope you all liked my card and thanks for stopping in! Have a great day!

SUPPLIES
SVG Cutting Files- MP3 Monkey

Monday, February 25, 2013

Thank You Bee


Hello everyone! It's time for a new challenge at My Craft Spot. This week the challenge is "Pop It Up" Use pop dots on your project. 
I just recently got a Silhouette Cameo and couldn't wait to cut out this adorable bee from Miss Kate Cuttables. She has some of the cutest files and a freebie everyday!
The only modification I made to this cut was to added punched circles over the heart eyes...which are super cute, but I didn't want them on this card. 
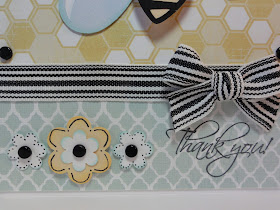
I inked all the edges of the bee and mounted the body on pop dots. I punched some flowers, added some brads in the center, and added them to the bottom pop dotting the middle one. I also added some brads to the upper frame and added a bow. To finish, I stamped the sentiment from My Craft Spot's Thank You stamp set. 
I hope you all will play along and please don't forget to go check out what the rest of the DT has created. Have a great day!

SUPPLIES
My Craft Spot- Thank You stamp set
Miss Kate Cuttables- Bee Mine Bee
Flower punches

Saturday, February 23, 2013

Orbit Hopping


Hello everyone! I wanted to share this card I did with the new Peachy Keen Stamp of the Month set and one of the new sentiment sets called Nuts And Bolts. These are such a fun sentiment set that go with the new PK bots perfectly!
I made a tall card for this one so I could add all these wonderful elements. I stamped and paper pieced the star, bot, and spaceship. I also used the new Sweet and Silly face stamps on them and used Glossy Accents on the bot's face. The star trail under the bot is stamped and heat embossed with the Happy Trails Spaceship stamp set. I also added some Glossy Accent dots to it. I cut a circle for the moon at the bottom and embossed it with the Seeing Spots cuttlebug folder. After I mounted it to the card, I cut the edges off. To finish I stamped the sentiments onto tag banners and mounted the star and spaceship on pop dots.
I hope you all like my card and thanks for stopping in! Have a wonderful day!

Peachy Keen-

Thursday, February 21, 2013

Spring Has Sprung


Hello everyone! I have a cute card to share that I did with my NEW Cameo!!! My hubby was so sweet and bought it for me for Valentines Day! I am having so much fun learning how to use it and cutting all these super cute files!
I used the SVG Cutting Files Sweet Baby Bunny file to cut out the bunny. I hid the face and stamped it with Peachy Keen's Teddy Bear Faces. How perfect is that face on the bunny?!?!?  I also cut some grass and added that too. For the side I hand cut banners and added a button with some twine. The sentiment is stamped from My Craft Spot's Butterfly Kisses stamp set. 
I am going to enter this into SVG Cutting Files challenge which is to use pastel colors. 
Thanks for stopping in and have a great day!

Supplies
My Craft Spot- Butterfly Kisses stamp set and Lemon Divine Twine
SVG Cutting Files- Sweet Baby Bunny

Wednesday, February 20, 2013

Gears Grinding?


Hello everyone! Today is my day to post over at Peachy Keen and I have a card to share. I used one of the new sentiment stamp sets on this card called Made On Planet Earth. I thought this would also be a perfect sentiment to go with the cute Funny Farm tractor. I LOVE this tractor stamp, it is just TOO CUTE! 

I paper pieced the tractor/boy and did some inking on him. I also used a Versa Mark pen to color in every other line of the tractor wheels. Using the Versa Mark pen is a great alternative if you want to highlight something because it usually only comes out a shade darker than the paper you color it onto. After the tractor was done, I mounted him to a rectangle mat. I rounded the corners, inked the edges for the sky, and added a piece of green matching paper for the bottom.
I stamped the cloud and sentiment and cut it out. I also stamped the sentiment at the bottom and added some dots with a black pen to lead you to the inside of the card where the rest of the sentiment is. The inside I finished as well with the rest of the sentiment and another piece of matching paper. 
I hope you all like my card and thank for visiting! Have a wonderful day!


Monday, February 18, 2013

Hi There


Hello everyone and Happy Monday!.....if there is such a thing! LOL! 
It's time for a new challenge at My Craft Spot! This week the challenge is "Flowers". Create a project using at least one flower. 
I made this card for my project today. I want Spring to come so bad, that I think I'm channeling that into my card making!
This is a pretty simple card to make. I started by cutting layers for the flower and leaves from Mother's Day Bouquet. I layered them together and curled up the edges to give it some dimension. I hand cut a simple strip for the stem and added the leaves to the side. After my flower was on my mat, I used a hole punch and punched holes on both sides at the bottom to thread the ribbon through. I tied a bow and added the tag I made using My Craft Spot's Tiny Tags and stamped the sentiment from MCS's Inside and Out Set #2. I attached the tag using some green twine and a bow. 
I hope you all will play along and please don't forget to check out what the rest of the DT has created. Have a great day!

Cricut- Mother's Day Bouquet

Thursday, February 14, 2013

Peachy Keen Sketch Challenge


Hello everyone! It's time for a new challenge at Peachy Keen! This week the challenge is a sketch...you can create anything you want as long as it is based on the sketch above. 
I made this fun card. I can't wait for spring and this card just brings a smile to my face. 
I paper pieced the turtle and flowers from the Peachy Keen June 2012 Stamp of the Month kit. I stamped the turtles face with the NEW Erkle and Merkle faces. These faces are just AWESOME! I LOVE them! I pop dotted the turtle's head for more depth and colored the flowers in the background at up top with Copic markers. I also added a picket fence which was cut from paper Doll Dress Up and I pop dotted the mat and folded the fence around. To finish I stamped the sentiment and added some twine to the flowers. 
I hope you all will play along and please don't forget to check out the rest of the DT's amazing projects. 
Have a great day!

Supplies
Peachy Keen- PKSC-06 June 2012, 
PK-180 Erkle and Merkle Face Assortment

What Planet Are You From?


I put him on an action wobble!


Hello everyone and HAPPY VALENTINES DAY! I have another card to share that I did with the cross promotion with Freckled Fawn and some NEW stamps that were released yesterday at Peachy Keen. There are several new sentiment stamp sets and 2 new face sets! I LOVE me some PK faces! LOL! You can never have to many!

I cut the card and alien from Life's A Party and stamped the face with one of the NEW face stamp sets called Sweet And Silly Face Assortment. (LOVE LOVE LOVE these faces!) I also put him on an action wobble. I stamped the sentiment with one of the NEW sentiment stamp sets called Twinkle Twinkle Sentiments and added some wood arrow pieces from Freckled Fawn that I inked to color them.
Here are the new Peachy Keen stamps that I used on this card


As an added bonus, we are giving away a $50 Gift Certificate to the Peachy Keen Store!  One lucky person will win this! How do you enter? Simply comment on all the Freckled Fawn posts throughout the week for a chance. The more Freckled Fawn/Peachy Keen blogs posts you comment on, the more chances you have to win!
Thank so much for stopping in and have a great day!
Freckled Fawn- Wood Chip Arrows
Cricut- Life's A Party

Wednesday, February 13, 2013

Don't Worry, Be Happy!


Hello everyone! Today I am showing a project that I did for a cross promotion between Peachy Keen Stamps and Freckled Fawn
Freckled Fawn is a Shop where you can get some really cool embellishments like washi tape, wood chips, and shaped paper clips, among other things. These are the 3 things that I used to dress up my project!

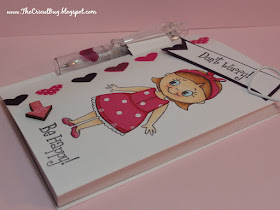
For my project I did this cute little notebook. I started with a $1 notebook from Michaels and used that as my pattern. I also used the pen and notebook from the set. 
I started by removing the cover from the original notebook and marked out what size I needed to cut my cover and where the score and cut lines were. 
After the cover was made, I stamped and paper pieced the girl from Peachy Keen's Darren and Laura Lee stamp set. I also used the sentiments from this stamp set to create the banner tag. 
I used my heart washi tape on the side of the notebook and I cut out one of the hearts and added it to the pen. I used the heart paper clip to attach the sentiment banner and stamped the rest of the sentiment at the bottom. To finish I added a wooden arrow pointing at the sentiment that I colored with a copic marker. 

I hope you all liked my project and check back at The Peachy Keen  Blog all this week for more fun projects with Freckled Fawn and Peachy Keen Stamps!

As an added bonus, we are giving away a $50 Gift Certificate to the Peachy Keen Store!  One lucky person will win this! How do you enter? Simply comment on all the Freckled Fawn posts throughout the week for a chance. The more Freckled Fawn/Peachy Keen blogs posts you comment on, the more chances you have to win!
Good luck and have a great day!

Monday, February 11, 2013

Love U!


Hello everyone! It's time for a new challenge at My Craft Spot. This week the challenge is "For Your Sweetheart" Create a Valentine for your sweetheart.
I made this card. I went out of my normal realm and created this shabby chic Valentine's card. I hope you all like it!
I started with the paper really...I used My Minds Eye Love Me 6X6 stack as my inspiration for this card. I cut out the banner from one of the sheets of paper and added a gray strip that I cut out using a pair of decorative scissors. I cut out the heart on my Cricut and also used my decorative scissors to cut the mat around it. I used a chipboard key that I got in a bag of pieces for $1 at Michaels and colored it with a metallic marker. After I colored it I used clear embossing powder on it and heat embossed it. I tied some Ivory Just String through a metal locket charm and attached it to the key. I used My Craft Spot's Tiny Tags dies and Tiny Tags 2 to create the tag and attached it to the card with more Ivory Jute String. To finish the card, I also stamped the inside with MCS's Always And Forever stamp set and added some decorative paper.
I hope you all will play along and please don't forget to check out what the rest of the DT has created! Have a great day!
SUPPLIES
Cricut- George And Basic Shapes
My Minds Eye Love Me paper stack

Saturday, February 9, 2013

You're Purr-fect!


Hello everyone! I have one of my last Valentine card to share with you today! I love My Craft Spot's Valentine's stamps. They are so fun and versatile. Did you know that most of the sentiments are broken up so you can create any kind of sentiment phrase you want. For example, the sentiments I used on this card could easily be used for a Thank you card or any other kind of kitty card because the "Valentine" is not connected!
Here is the set that I used on this card:

I cut the kitty from Create A Critter 2 and did not add her tiara. I also added some brown spots with scrap paper that I cut by hand and stamped the face with Peachy Keen's Here Kitty Kitty faces stamps. AND, did you notice....I gave her a tail! I don't know why these cuts never include a tail! I did this in my Gypsy by welding a J from George and Basic Shapes to her. I also gave her a collar and used my I-ROCK to apply some gems to it.
The rosette is cut from Ribbons and Rosettes and I added a pink gem to the center. To finish, I stamped the sentiment from My Craft Spot's Build A Valentine stamp set.
I hope you all liked my card and thanks for stopping in. Have a wonderful day!

SUPPLIES
My Craft Spot- Build  A Valentine stamp set
Peachy Keen- Here Kitty Kitty Face Assortment
Cricut- George and Basic Shapes, Create A Critter 2, and Ribbons and Rosettes
I-ROCK and gems