Hello everyone! I finally got to use my Four Legged Friends cart! O.K., I need to tell you that when I decided on this image I thought it was a dog.....but in fact when I pushed the button on my Cricut it said cat5. You all will have to tell me what you think....cat or dog! :) I cut the CAT at 3 inches and the paw print at 1 inch. I used this purple match book card as my base. When I put the paw print down and then the "thank you" stamp it kind of looked like the CAT was signing it....or so I think it does. LOL! To finish it I added ribbon to the top and bottom. I think this is SO CUTE! I hope you all have a great day and if your in need of new carts, check out my previous post before for Cricut Machine....$14.95 carts for 48 hours only! Take care!
Thursday, December 30, 2010
Thank You Card
Hello everyone! I finally got to use my Four Legged Friends cart! O.K., I need to tell you that when I decided on this image I thought it was a dog.....but in fact when I pushed the button on my Cricut it said cat5. You all will have to tell me what you think....cat or dog! :) I cut the CAT at 3 inches and the paw print at 1 inch. I used this purple match book card as my base. When I put the paw print down and then the "thank you" stamp it kind of looked like the CAT was signing it....or so I think it does. LOL! To finish it I added ribbon to the top and bottom. I think this is SO CUTE! I hope you all have a great day and if your in need of new carts, check out my previous post before for Cricut Machine....$14.95 carts for 48 hours only! Take care!
Wednesday, December 29, 2010
Hi everyone! I just wanted to let you all know that Cricut Machine has a HUGE sale going on for 48 hours!!! 60 carts for only $14.95!!!!! I just ordered Straight From The Nest for only $14.95! I might even go and order more....:) I have ordered here ALOT and I just ordered Birthday Bash on the 26th and it will be here already tommorow! I think this site is AWESOME!!!Have a great night!
Mojo Monday 171
Hi everyone. Here is a card that I did for Mojo Mondays challenge for this week. With my new Cricut carts I should be using them but I got this cute stamp sets from Michaels the other day and wanted to give her a try. I stamped the snowman, let it snow circle and the backround paper squares. I added some shimmer stickles to the edges of the snowman and also to his scarf. I also embossed the let it snow circle with clear embossing powder and pop dotted it to the card. For the final touches I added a ribbon and brads to the corners of the card. I am itching to cut something out with my Four Legged Friends cart, so watch for the maybe tommorow! Have a great day everyone and take care!
Tuesday, December 28, 2010
Flaunt It Fridays #4
Hi everyone! Flaunt It Fridays challenge this week was the turtle from Create A Critter and this is what I came up with. Valentines Day is just around the corner and I thought this would make a cute treat bag. I cut the bag from Wrap It Up at 5X10 inches. I stretched it to get this wider bag. I then cut 2 hearts from Sweet Treats and put stickles dots around the edges. For the turtle I hid the circles in the shell and replaced them with the same heart from Sweet Treats and filled them in with stickles. I also wrapped the handle with decorative ribbon. I think this turned out so cute! I hope you all are having a great day!!!
Monday, December 27, 2010
Birthday Tri-Fold Card
HI everyone! I'm BACK!!! :) And I got Twinkle Toes and Four Legged Friends for Christmas! I am SO EXCITED! These carts are so cute! For my card I cut the alligator and all the frames from Twinkle Toes. The cake is cut from Smiley Cards and the balloons were cut from Once Upon A Princess. The "eat cake" is a stamp and the sentiment on the side I printed off my computer. I found a tutorial here for this kind of Tri-Fold card....it's a YouTube video. This card is for my Mom for her birthday which is today.....I hope she thinks it's as cute as I do. Have a great day everyone!
Tuesday, December 21, 2010
Past Post Revisited
Hi everyone! I have been so busy that I have had NO TIME to work in my craft room so I decided to post a project that I did back in July. I just love how this layout came out and thought it was fitting for the season. I used the bear cut from Live Simply. If you want all the details you can go here to see my July post. Merry Christmas everyone and hopefully I'll be back paper crafting soon! TAKE CARE AND HAVE A SAFE HOLIDAY SEASON!
Thursday, December 16, 2010
Snowflake Tin Ornament
This is the ornament on my tree
Hanging on my light
Good evening everyone! Isn't this ornament BEAUTIFUL? I really had my thinking cap on for this one! I made this ornament with none other than the triangle box from TBBM. I cut 2 triangle boxes at 4 inches wide in my Gypsy. The exact measurements were 9.72 wide X 4 inches high. I glued them together to get this triangle shaped ornament and put a piece of wire through the top for a hanger. I then traced each side of the ornament on to plain white paper for a pattern and then I traced the pattern onto silver metal sheeting and cut them out. Then I ran each piece through the cuttlebug to get the snowflake pattern embossed on them and then I colored the metal with my blue copic marker. Can you believe they color stayed on the metal and it only takes seconds for it to dry. These markers are AWESOME! Next I sanded over the top to get the raised images silver once again. I put each piece on with a combination of sticky tape and a hot glue gun. Then I hot glued silver beading down each edge to hide my seams and added a bow at the top. This ornament is quite large. It's about 7 inches tall. I am going to enter this into Fantabulous Cricuts challenge this week which was to make a home decor project. I hope you all are having a great day!
Wednesday, December 15, 2010
JOY Snowman
Hi everyone! Here is a card that I made for several challenges. I cut the snowman from Christmas Cheer at 3.5 inches and the snowflakes from Wrap It Up at 1 inch. I chalked around the edges of the snowman, scarf, and snowflakes with blue. Then I used my alphabet stamp set to stamp the letters J O and Y. I tied a piece of string around the snowman's hands and pop dotted the snowflakes to the snowman. I also embossed snowflakes on the white backround with my Cuttlebug and added a matching strip of pattern paper on the inside. I am entering this into the following challenges:
1. Paper Playtime- Snowmen
2. Cricut Cardz- Christmas card with mini banner
Sunday, December 12, 2010
HO! HO! HO!
Hi everyone! What a crazy weekend! We got so much snow that I am sick of it already! :) It will be nice for Christmas, but after that it can go away without me complaining! LOL!
Isn't this card SO CUTE!!!! I just got the I-Top tool and couldn't wait to do something with it, so here is my creation. I cut the santa from Winter Frolic at 4 inches and framed him. The frame was cut from George at 2.5 inches, then I glued the frame where I wanted it and cut the rest of santa away around it to get it to look like he's looking through a window. The buttons I made with my I-Top from stamped HO! HO! HO!'s on red cardstock. The paper is from DCWV Christmas Combo stack. I am entering this card in the following challenges:
1. Bitten By The Bug 2- Santa from Winter Frolic
2. Jitterbuggin'- Santa
3. Cooking With The Cricut- No red or green together
Flaunt It Fridays #2
Happy Sunday everyone! I am finally able to sit down and post this. I have been Christmas shopping and dealing with 12 inches of snow. We just finished shoveling our driveway and it was awful! TOO MUCH SNOW! LOL!
Anyway, on to my card! Flaunt It Fridays challenge this week was to use the sleigh from PDDU. I cut the sleigh at 2.5 inches twice in the gold and pattern paper. Then the gold one I trimmed out the center and pop dotted it to the patterned piece. This gave it some really nice dimention. I cut a strip of coordinating paper with snowflakes on it and matted it in purple and put it on the bottom of the card and on the inside. I tied a ribbon and added a snowman charm to the center. All the paper I used was from DCWV Christmas Combo Stack. I hope you all are having a wonderful day! Take Care!
Saturday, December 11, 2010
White Wreath Card
Happy Saturday everyone! I am off Christmas shopping today...it's going to be so busy that I am actually dreading it! LOL! This is a card that I did for Cricut Cardz Challenge. The challenge was to make a circle shaped card in any colors EXCEPT red or green. This card is a little different. I cut my card from Smiley Cards at 5 inches and the wreath base from Jolly Holidays at 5 inches. The card I stretched in my Gypsy to be more of a circle and I embossed it with my Cuttlebug using the Snowflakes folder. Then I puched ALOT of snowflakes and folded them in half and glued them all to the wreath base. I added a bow on the top and jewels for the ornaments. I think it turned out kind of neat looking....what do you think? I hope you all are having a wonderful weekend! Take care.
Friday, December 10, 2010
Guest Designer For MAG Challenge By The Page
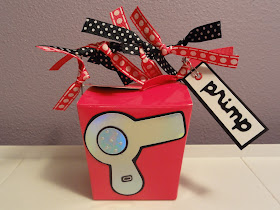
Hi everyone! I am so excited....I got to be a guest designer for the first time! I am guest designer for M.A.G. Challenge By The Page today. For this challenge you were to use Paisley page 59. If you have never been to this new challenge blog here are the rules....Every Friday they post a new challenge. They give you the cartridge and page number and you are to use only the Cricut cuts on that page. So here is my project. I bought this little take-out box and filled it with hair accessories. I cut the blow dryer at 4 inches and custom sized the shadow in my Gypsy. I didn't like how wide the original one was. I used my Cuttlebug to emboss the vent on the dryer and I left off the heart. The tag I cut by hand and the word Primp I cut at .5 inches. I finished it off by tying ribbon to the handle in coordinating colors. I hope you all like my FIRST ever design project and I hope you will check out M.A.G. Challenge By The Page and participate in a challenge. Have a great day and take care!
Thursday, December 9, 2010
Fantabulous Cricut #39 Santa Gift Basket
Hello everyone! I have been working on my gift baskets and this is another one. For this one I used Doodlecharms for the santa and the reindeer. I used Wrap It Up for the pillow box that has the hot chocolate inside and I made a bag for the tootsie rolls with an acetate window. For the cookie packs I made simple sleeves and just tied a ribbon around the mint stir sticks. I am going to enter this into Fantabulous Cricuts weekly challenge which is to make a gift or gift packaging.
Tuesday, December 7, 2010
Hi everyone! This is a card that I did for Crafting With Cristina's companion challenge. The challenge was to make a card inspired by a Christmas song. Mine is Up On The Rooftop. I cut the house from Jolly Holidays at 4 inches and the tree at 2 inches. I didn't want the whole tree so I cut off the bottom. I embossed the white backround with Swiss Dots and the sentiment is printed from my computer. I'm not that happy with this card. It needs something and I can't figure it out so this is it. :) LOL! I hope you all are having a wonderful day! Take Care!!!
Monday, December 6, 2010
Homemade Bows
Good morning everyone! I wanted to make some homemade bows and remembered doing these back in July. I found the tutorial at Passionately Artistic I used back then and can be found here. I know there are alot of different bows out there but I really like these and they are SUPER SIMPLE to make. No fancy tools, just a paper cutter, paper, glue, hole punch, and brads. I did modify mine just a little....instead of doing each layer on a brad separately and then assembling it all with glue dots, I put all of mine on one brad including the center loop. They hold together alot better this way. The big blue one is out of plain cardstock that I inked white on the edges. The big red and pink one is out of double sided cardstock. The small ones I actually cut the sizes in half and came up with these 2 variations. The red one has only 3 layers and is out of plain cardstock and the blue one has all the layers and I did this one out of light weight pattern paper. The pattern paper didn't cut so well when you get to the end of the paper and also it looks funny with the white on the inside, but it was alot easier to assemble the small ones out of it. So if they look like fun, give them a try. They really are pretty and it would be easy to personalize a special gift.
Sunday, December 5, 2010
Squirrel Holiday Card
Good morning my blog friends! I made this card especially for a friend of mine that LOVES squirrels. I cut the squirrel at 3 inches from none other than Jolly Holidays....I told you I love this cart right? :) The snow on the bottom is a torn piece of paper that I embossed with Swiss Dots. The sentiment is a stamp that I framed in green and then pop dotted to a piece of ribbon. I also pop dotted the squirrel. To finish it off I added a strip of paper to the inside of the card and then cut trees from the backround paper and added them to the inside of the card as well as the envelope. I am going to enter this card into the following challenges.
More Than Favors Wacky Wednesday #17: Holiday card with embossing
Saturday, December 4, 2010
3X3 Mini Card Set
Hello everyone. I made this mini card set with the snowmen from Jolly Holidays. I can't help using this cart.....I really do love everything about it. I hope you all won't get sick of it! :) I cut a 12X12 piece of white paper in half, and then cut 3 inch strips to get my 3X3 cards. The red snowman I cut at 2 inches, the green at 1.75 inches, and the blue at 2 inches. I added a matching ribbon to the side of each card. I also cut this adorable envelope from Once Upon A Princess. I never noticed it before and now I just LOVE how cute it is. I hope you all can see it clearly. It's just a little fancier than a plain envelope. I am going to enter this into the following challenges
Cricut Cardz: Make a 3X3 Christmas card set
Fantabulous Cricut: Use Ribbon
Friday, December 3, 2010
Snowman Ornament Card
Happy Friday everyone! There is a new challenge blog that I am so excited about! It looks like so much fun! It's called Flaunt It Fridays. This card I made to enter into their first challenge which was to use the snowman on page 29 of Winter Frolic. I cut the ornament card from Winter Frolic at 7 inches that I welded together in my Gypsy. The snowman I cut at 2.5 inches and the snowflakes are a punch. I added silver paper to the top of the ornament and used rick rack as trim on the outside as well as the inside. I double pop dotted the snowman and single pop dotted the snowflakes. I hope you all will check out this new challenge blog! I am also going to enter this in Gigi's Creative Designs challenge which was to make a holiday card and use pop dots. Take care and have a great weekend!